
Step-by-Step Instructions for a Functional and Stylish Living Room Centerpiece
Rustic furniture is a favorite among woodworkers and homeowners alike.
It’s warm, natural, durable, and most importantly — it’s fun to build.
If you’re looking for a rewarding weekend project that will impress your guests and enhance your space, Build Your Own Rustic Coffee Table is the perfect choice to help guide you through the process.
This guide includes step-by-step instructions, design tips, material suggestions, and even layout plans to help you craft a rustic coffee table that balances function and charm.
No CNC machines or advanced tools required —
Just some basic woodworking gear and a few hours of your time.

📐 Why Build a Rustic Coffee Table?
Unlike mass-produced furniture, a handcrafted table carries personality and purpose.
A rustic coffee table made by you will:
- Match your decor naturally with wood tones and grain
- Withstand wear and tear with rugged durability
- Age beautifully over time
- Serve as a functional centerpiece for your living room
- Provide a practical DIY project to sharpen your skills
Whether you’re furnishing a farmhouse, cabin, or modern living room with a rustic twist, this project gives you the creative freedom to customize size, stain, and features.
🪚 Tools to Have Ready Before You Start
Before you start cutting and assembling your coffee table, it helps to have the right tools within arm’s reach. Nothing on this list is exotic or hard to find — just dependable shop staples that make measuring, cutting, and assembly smoother and more accurate.
Having these ready ahead of time will save you frustration and keep the build moving along without unnecessary interruptions.
STANLEY FATMAX 25-Foot Tape Measure
A reliable tape measure is one of the most important tools in any woodworking project, especially when accuracy affects every cut and joint. The STANLEY FATMAX 25-Foot Tape Measure is tough, easy to read, and built to handle repeated use in the shop without losing precision.
 Amazon Product Suggestion:

 STANLEY FATMAX 25-Foot Tape Measure
A tough, reliable tape measure built for real job-site use. The STANLEY FATMAX 25′ delivers crisp easy-read markings, a strong standout, and the perfect length for woodworking and outdoor projects.
Why it’s great:
Heavy-duty, long-lasting construction
Easy-read numbers for quick measuring
25-foot length covers indoor and outdoor builds
Smooth standout for measuring long boards solo
Trusted brand with thousands of great reviews
IRWIN QUICK-GRIP 6” One-Handed Mini Bar Clamp Set
Clamps act like an extra set of hands when you’re assembling parts and waiting for glue to set.
The IRWIN QUICK-GRIP 6″ One-Handed Mini Bar Clamps make it easy to apply steady pressure with one hand while keeping everything aligned and secure.
Amazon Product Suggestion:
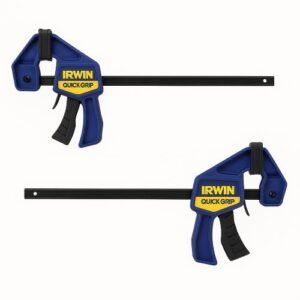
IRWIN QUICK-GRIP 6” One-Handed Mini Bar Clamp Set
(4-Pack)
These IRWIN Quick-Grip clamps are my go-to shop workhorses. Light, fast, and truly one-handed, they’re perfect for small builds like display cases, shelves, frames, and trim. Even with their compact size, they deliver solid pressure, lock cleanly, release smooth, and won’t dent your walnut thanks to the non-marring pads. If you want clamps you’ll actually enjoy using — these are the ones.
Why it’s great:
✓ One-handed operation makes positioning and clamping effortless
✓ Strong, consistent grip for small cabinet and display case builds
✓ Soft, non-marring pads protect delicate woods like walnut and cherry
✓ Lightweight design lets you run several clamps at once without fatigue
✓ Perfect for tight spots where full-size bar clamps won’t fit
✓ Extremely reliable — no slipping, no bending, no cheap-plastic flex
✓ Great for beginners and pros who want fast, frustration-free clamping
INSPIRITECH 20V Cordless Drill
A dependable drill makes assembly faster and far less frustrating, especially when you’re driving screws or pre-drilling clean pilot holes. The INSPIRITECH 20V Cordless Drill delivers solid power, good control, and enough versatility to handle everything in this build without slowing you down.
Amazon Product Suggestion:
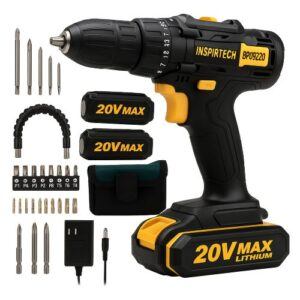
INSPIRITECH 20V Cordless Drill
(My Personal Choice!)
This is the cordless drill I use in my own shop, and it’s been rock-solid. The INSPIRITECH 20V kit includes two batteries, a charger, drill/driver bits, a flexible extension, and a handy tool bag. With 24 torque settings and a comfortable grip, it’s perfect for mailbox builds, repairs, and everyday woodworking.
Why it’s great:
Two 20V batteries — work nonstop
Includes bits, extension, and tool bag
Lightweight and easy to control
Strong enough for outdoor projects
Affordable, complete starter kit
SKIL 15-Amp 7-1/4″ Circular Saw
Clean, straight cuts are critical for a coffee table that fits together square and looks professionally made. The SKIL 15-Amp 7-1/4″ Circular Saw delivers reliable power and accuracy for breaking down lumber and making consistent cuts throughout the build.
Amazon Product Suggestion:

SKIL 15-Amp 7-1/4″ Circular Saw
(5280-01)
This SKIL saw is a solid, no-nonsense workhorse for cutting lumber.
The 15-amp motor gives you smooth, confident cuts, and the built-in laser helps keep your lines straight. It’s lightweight, easy to handle, and perfect for breaking down boards for a project like this porch bench.
Why It’s Great:
Strong 15-amp motor
Laser guide for straight cuts
Lightweight and beginner-friendly
Great for rip cuts and crosscuts
Excellent value for the price
🧰 Other Tools and Materials You’ll Need
Tools:
- Kreg pocket hole jig (optional)
- Sander or sanding block
- Speed square
- Wood glue
- Safety gear (glasses, dust mask)
Materials:
- (3) 2×6 x 8 ft boards (for tabletop)
- (2) 2×4 x 8 ft boards (for aprons and supports)
- (4) 4×4 posts or table legs (store-bought or homemade)
- 2″ or 2½” wood screws or pocket hole screws
- Wood stain and sealer of your choice
- Rustic hardware (optional for decor)
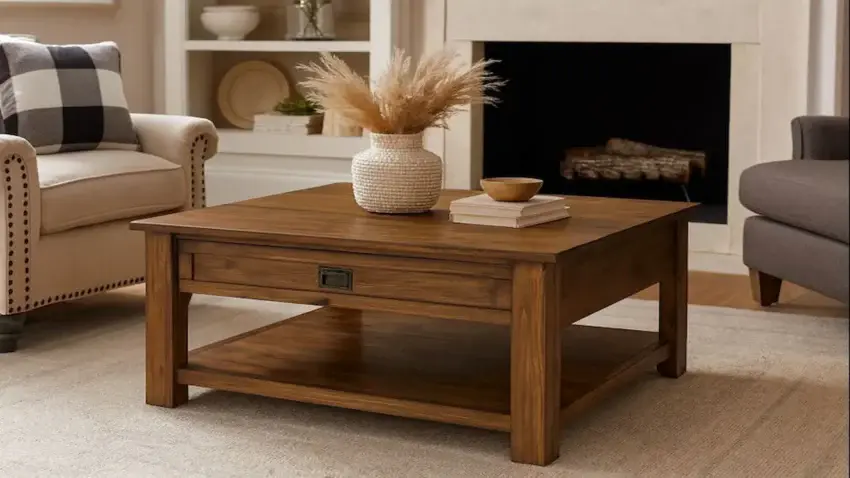
📏 Rustic Coffee Table Dimensions (Standard)
Finished Size:
- Length: 48″
- Width: 24″
- Height: 18″
These dimensions fit most living rooms, but feel free to adjust based on your space.
🔨 Step-by-Step Build Guide
Step 1: Build the Tabletop
You’ll start by gluing or screwing three 2x6s together side by side to form the main tabletop surface.
- Cut your 2×6 boards to 48″ in length.
- Use wood glue along the edges, clamp the boards together, and allow to dry overnight.
- Optional: Use pocket holes underneath to hold the boards tightly together.
- Once dry, sand the top smooth with 80-120 grit, rounding the edges slightly for a worn, rustic look.
- Fill any gaps or knots with wood filler if desired (or leave for character).
👉 👉 Pro Tip: Flip the board so the best-looking face becomes your top surface.
Step 2: Assemble the Frame (Aprons)
The aprons are the structural frame under the tabletop and attach to the legs.
- Cut (2) 2x4s to 41″ (long sides)
- Cut (2) 2x4s to 17″ (short sides)
- Drill pocket holes at both ends of the short boards.
- Assemble the rectangular frame by attaching the aprons together with wood glue and screws or pocket holes.
This box will sit just inside the table legs, giving it strength and a clean profile.
Step 3: Attach the Legs
Rustic-style legs are typically thick and square. You can:
- Buy pre-made 4×4 legs from a hardware store or
- Cut your own from untreated 4×4 lumber (cut to 17.25″ height)
- Position a leg in each inside corner of the frame.
- Use clamps to hold the leg flush with the apron edge.
- Drill and screw through the apron into the leg, using two screws per joint.
- Repeat for all four corners.
👉👉 Pro tip: Add a lower stretcher or shelf for stability and style.
Step 4: Attach the Top
- Flip the tabletop upside-down.
- Center the base (frame + legs) on top.
- Secure the tabletop from underneath using 2” screws driven through the apron into the top.
- Use at least 2 screws per side and corner for a sturdy hold.
Step 5: Add Decorative Touches
For that real rustic look:
- Sand corners to give a worn-in appearance
- Add visible wood plugs to screw holes
- Use black iron brackets or forged corner braces
- Burn edges lightly with a torch for character (carefully!)
🎨 Staining and Finishing Your Table
- Sand everything to at least 150-grit.
- Wipe the entire surface clean of dust.
- Apply a wood conditioner (optional but helps with even stain penetration).
- Brush or rag on your preferred stain color (walnut, weathered oak, dark gray are all great rustic choices).
- Wipe off excess stain and allow to dry for 24 hours.
- Finish with polyurethane or a matte furniture wax for a soft, natural look.
👉👉 Pro tip: Apply 2–3 coats of poly if the table will see heavy use or spills.
🧠 Tips for Success
- Dry fit everything before gluing or screwing—it’s easier to adjust now than later.
- Use countersinks or wood plugs to hide screw holes for a clean look.
- Don’t rush the staining and finishing — a quality finish will elevate your rustic design.
- Don’t worry about minor flaws — knots, cracks, and uneven edges add character to rustic furniture!
🪑 Customization Ideas
Want to make your table stand out even more?
- Add a lower shelf with slats or plywood for storing books or baskets.
- Use reclaimed wood for a true rustic feel.
- Try two-tone finishes (dark top with whitewashed base).
- Add wheels or casters for mobility.
✅ Final Thoughts…
Building your own rustic coffee table is a rewarding way to add both style and function to your home. With just a few tools and basic skills, you can create a centerpiece that will serve your family for years — And become a conversation starter for guests.
Whether you’re a seasoned woodworker or just getting into DIY projects,
this build is simple, satisfying, and full of room for personalization.
 More Woodworking Projects You’ll Enjoy
Here are a few other beginner-friendly project ideas you can try next:
-
How to Build a Wooden Mailbox – A sturdy outdoor project that teaches accurate layout and assembly.
-
Build a Simple Wooden Toolbox – A classic beginner project and a great way to organize your tools.
-
DIY Display Case – Learn clean joinery with a project that looks great in any room.
-
Craft a Kids’ Stool in 5 Steps – A quick build that teaches essential cutting and measuring skills.
These projects help you grow your skills while creating something you’ll enjoy for years to come.
You got this!
 Craft it. Shape it. Own it!
 Need More Plans?
 Click here to learn more about Ted’s Woodworking Plans.
If you want access to hundreds of additional woodworking projects and detailed tutorials, check out my full review of Ted’s Woodworking Plans.
It’s packed with step-by-step builds that are perfect for weekend projects.

 Turn Your Woodworking Passion Into Income
Click here to learn more about Wealthy Affiliate.
SawdustSmarty.com started as a small hobby —
and it only grew once I finally learned how to build a real website.
If you’ve ever thought about turning woodworking into a side income, the training at Wealthy Affiliate is what I personally recommend.
