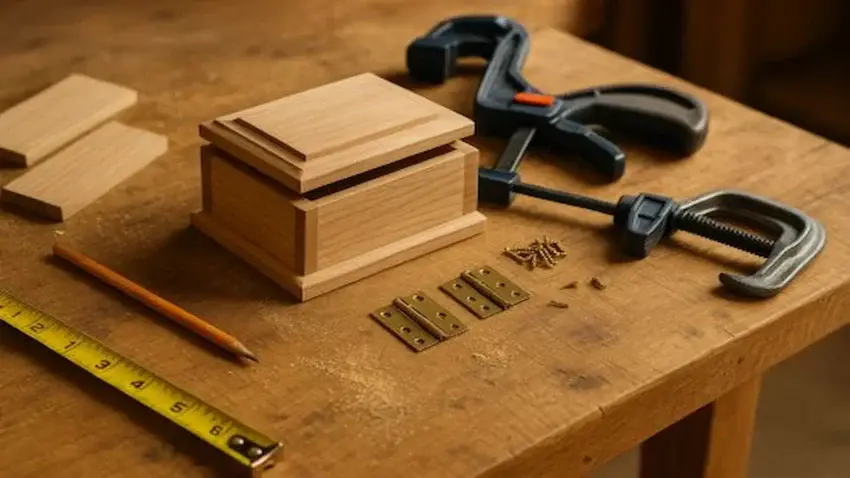
Building a jewelry box is one of the most
rewarding beginner woodworking projects —
but having the right tools and materials makes the process
smoother, cleaner, and more enjoyable.
In this guide,
you’ll find the essential tools, materials, and product recommendations
you need to build a jewelry box with confidence.
👉 Want the full step-by-step build guide?
How To Make A Wooden Jewelry Box (Step-by-Step Guide + Plans)

🧰 Tools & Materials You’ll Need
Before you start cutting, gluing, and assembling your jewelry box,
make sure you’ve got the right tools on the bench.
Having everything within reach keeps the build
smooth, accurate, and frustration-free.
You’ll need:
-
Tape Measure
-
Clamps
-
Drill
-
Jigsaw
-
Sander
-
Wood Glue
-
Hinges & Small Screws
-
Fine-grit Sandpaper
-
Your choice of hardwood (oak, walnut, cherry, etc.)
🔧 Why These Tools Matter
A jewelry box might be small, but the details matter.
These three tools —
a tape measure, a solid set of clamps, and a smooth-running sander —
keep everything square, tight, and clean as you build.
Accurate measurements ensure your lid and base line up perfectly,
clamps hold your pieces steady while the glue cures,
and the sander gives you that silky-smooth finish that makes a jewelry box
feel handcrafted instead of homemade.
STANLEY FATMAX 25-Foot Tape Measure
If you’re building anything in the shop,
a reliable tape measure is a must.
Here’s a solid pick to keep your cuts accurate.
🌟 Amazon Product Suggestion:
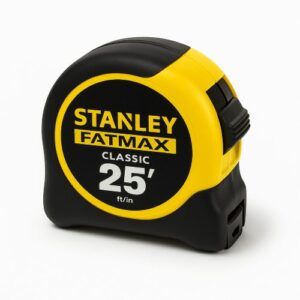
✔️ STANLEY FATMAX 25-Foot Tape Measure
A tough, reliable tape measure built for real job-site use.
The STANLEY FATMAX 25′ delivers crisp easy-read markings, a strong standout,
and the perfect length for woodworking and outdoor projects.
Why it’s great:
✔️ Heavy-duty, long-lasting construction
✔️ Easy-read numbers for quick measuring
✔️ 25-foot length covers indoor and outdoor builds
✔️ Smooth standout for measuring long boards solo
✔️ Trusted brand with thousands of great reviews
IRWIN QUICK-GRIP 6” One-Handed Mini Bar Clamp Set
A good set of clamps is like having an extra pair of hands in the shop.
These IRWIN Quick-Grips are perfect for fast, reliable pressure.
🌟 Amazon Product Suggestion:
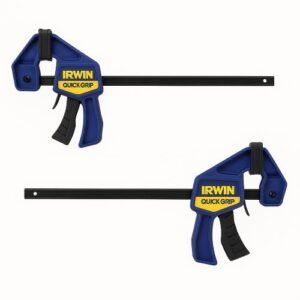
✔️ IRWIN QUICK-GRIP 6” One-Handed Mini Bar Clamp Set
(4-Pack)
These IRWIN Quick-Grip clamps are my go-to shop workhorses.
Light, fast, and truly one-handed, they’re perfect for small builds like
display cases, shelves, frames, and trim.
Even with their compact size, they deliver solid pressure, lock cleanly, release smooth,
and won’t dent your walnut thanks to the non-marring pads.
If you want clamps you’ll actually enjoy using —
these are the ones.
Why it’s great:
✔️One-handed operation makes positioning and clamping effortless
✔️Strong, consistent grip for small cabinet and display case build
✔️Soft, non-marring pads protect delicate woods like walnut and cherry
✔️Lightweight design lets you run several clamps at once without fatigue
✔️Perfect for tight spots where full-size bar clamps won’t fit
✔️Extremely reliable — no slipping, no bending, no cheap-plastic flex
✔️Great for beginners and pros who want fast, frustration-free clamping
SKIL 5” Random Orbital Sander
A quality random-orbital sander levels surfaces fast and clean.
This SKIL model is perfect for beginners and weekend builders alike.
🌟 Amazon Product Suggestion:
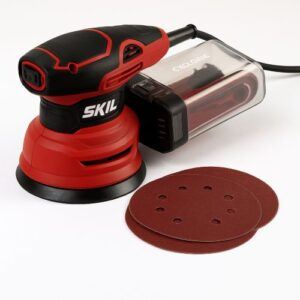
✔️ SKIL 5” Random Orbital Sander
(with Cyclonic Dust Box)
This SKIL 5” random-orbital sander is a killer little powerhouse —
perfect for smoothing out your walnut display case,
taking down glue squeeze-out, or prepping panels before finishing.
It’s compact, strong, and stupid-easy to control.
The built-in cyclonic dust box actually works
(rare for budget sanders),
keeping the air cleaner while you work.
Why it’s great:
✔️ Random-orbit finish for smooth, swirl-free sanding
✔️Cyclonic dust box that actually traps dust
✔️Comfortable grip for long sanding sessions
✔️Variable speed for precise control on any wood
✔️Low vibration for accuracy and less fatigue
How These Tools Fit Into The Build Process
These tools are used throughout different stages
of building your jewelry box —
from cutting and assembly to
sanding, finishing, and installing hardware.
If you’re following a complete step-by-step guide,
these tools will help you achieve cleaner cuts, tighter joints,
and a more professional final result.
If you’re ready to put these tools to work and
build your jewelry box step by step,
follow this complete guide:
👉 How To Make A Wooden Jewelry Box (Step-by-Step Guide + Plans)
Final Thoughts…
Having the right tools and materials
can make a huge difference in
how your jewelry box turns out.
Even simple upgrades can improve your
accuracy, finish, and overall results.
Start with the basics, build your skills,
and upgrade your setup as you go.
Come on man… You got this!
 Craft it. Shape it. Own it!