
This step-by-step guide to cutting wood with a circular saw is designed to take the
intimidation out of one of the most useful tools in the woodshop.
While a circular saw may look a little aggressive at first,
understanding how the blade, motor, and safety guard work together
makes all the difference.
Once you grasp these basics, you’ll be able to make cleaner,
more controlled cuts and approach your woodworking projects with confidence.

📏 Must-Have Tools for Cutting Wood With a Circular Saw
Before you start cutting wood with a circular saw, having the right supporting tools in place makes a huge difference in both safety and accuracy. While the saw does the cutting, tools like a speed square and clamps help keep your lines straight, your workpiece secure, and your hands out of harm’s way. The three tools below work together to give you cleaner cuts, better control, and a much more confident cutting experience—especially if you’re just getting started.
🪚 Circular Saw (Obviously)
A reliable circular saw is the foundation of clean, controlled cuts, especially when you’re learning proper technique. This 7-1/4″ corded saw delivers consistent power, easy depth and bevel adjustments,
and the stability needed to make straight, accurate cuts without fighting the tool.
 Amazon Product Suggestion:

 SKIL 15-Amp 7-1/4″ Circular Saw
(5280-01)
This SKIL saw is a solid, no-nonsense workhorse for cutting lumber.
The 15-amp motor gives you smooth, confident cuts, and the built-in laser helps keep your lines straight. It’s lightweight, easy to handle, and perfect for breaking down boards for a project like this porch bench.
Why It’s Great:
Strong 15-amp motor
Laser guide for straight cuts
Lightweight and beginner-friendly
Great for rip cuts and crosscuts
Excellent value for the price
GRENPRO Combination Square & Carpenter Square Set
When working with wood grain, accuracy matters. Having reliable layout tools makes it easier to mark straight lines, check squareness, and keep your cuts aligned with the grain instead of fighting it.
Amazon Product Suggestion:
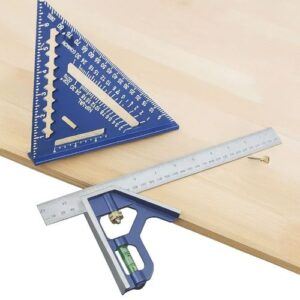
✔ GRENPRO Combination Square & Carpenter Square Set
(7″ & 12″)
This GRENPRO square set is a practical, beginner-friendly option for accurate measuring and layout work in the shop. The combination of a 7-inch carpenter square and a 12-inch combination square covers most everyday woodworking tasks, from marking straight cuts to checking angles and squareness before assembly.
The aluminum body keeps the tools lightweight but sturdy, while the stainless steel ruler provides clear, easy-to-read markings. The built-in bubble level on the combination square is a handy bonus for quick alignment checks, making this set a dependable choice for DIY projects and weekend builds.
Why It’s Great:
✔ Includes both carpenter square and combination square
✔ Durable aluminum construction with stainless steel ruler
✔ Built-in bubble level for quick accuracy checks
✔ Lightweight and easy to handle
✔ Excellent value for beginner woodworking setups
IRWIN QUICK-GRIP 6” One-Handed Mini Bar Clamp Set
A solid set of clamps is one of the easiest ways to improve both safety and accuracy when using a circular saw. These one-handed bar clamps make it quick to secure your workpiece or hold a straightedge in place, helping prevent shifting, blade wander, and kickback while you cut.
Amazon Product Suggestion:

IRWIN QUICK-GRIP 6” One-Handed Mini Bar Clamp Set
(4-Pack)
These IRWIN Quick-Grip clamps are my go-to shop workhorses. Light, fast, and truly one-handed, they’re perfect for small builds like display cases, shelves, frames, and trim. Even with their compact size, they deliver solid pressure, lock cleanly, release smooth, and won’t dent your walnut thanks to the non-marring pads. If you want clamps you’ll actually enjoy using — these are the ones.
Why it’s great:
One-handed operation makes positioning and clamping effortless
Strong, consistent grip for small cabinet and display case build
Soft, non-marring pads protect delicate woods like walnut and cherry
Lightweight design lets you run several clamps at once without fatigue
Perfect for tight spots where full-size bar clamps won’t fit
Extremely reliable — no slipping, no bending, no cheap-plastic flex
Great for beginners and pros who want fast, frustration-free clamping
🪚 Using a Circular Saw for Clean, Accurate Cuts
A circular saw is one of the most versatile tools in a woodworking shop, especially for breaking down lumber and sheet goods.
When used correctly, it delivers straight, repeatable cuts that form the foundation of a solid build.
The key is setup, control, and taking your time.
Step 1: Set Your Cutting Depth
Adjust the blade depth so it extends just below the thickness of the material — about ¼ inch is ideal.
This improves control, reduces tear-out, and keeps the cut safer and cleaner.
Step 2: Mark and Guide the Cut
Clearly mark your cut line using a straightedge or speed square.
For longer cuts, clamp a straight board or guide to act as a fence.
A guide helps keep the saw steady and prevents wandering during the cut.
Step 3: Support the Workpiece
Always support both sides of the cut.
Place your board on sawhorses or foam insulation so the offcut can fall freely without pinching the blade. Never let a board sag or twist while cutting.
Step 4: Start the Saw Before the Cut
Bring the saw up to full speed before contacting the wood.
Ease the blade into the cut smoothly and maintain a steady forward motion without forcing the saw.
Step 5: Let the Saw Do the Work
Apply light, consistent pressure and focus on keeping the base plate flat against the wood.
Forcing the saw increases the risk of kickback and rough cuts.
Stay focused on the cut line until the blade exits the material completely.
⚠️ Circular Saw Safety Tips
👉 Keep both hands on the saw at all times
👉 Stand slightly to the side of the blade path
👉 Wear eye and hearing protection
👉 Unplug or remove the battery before adjustments
👉 Wait for the blade to stop before setting the saw down
🧠 Pro Tips for Better Circular Saw Results
👉 Use a sharp blade matched to your material
👉 Cut with the good face down to reduce tear-out
👉 Clamp your work whenever possible
👉 Take your time—accuracy beats speed every time
🪵 Final Thoughts…
A circular saw is more than just a rough cutting tool —
It’s the backbone of countless woodworking projects.
When properly set up and guided, it can produce clean, accurate cuts that rival more expensive shop tools.
Mastering your circular saw builds confidence fast.
Focus on control, safety, and precision,
and every project that follows will come together easier and cleaner.
You’ve got this.
 More Woodworking Projects You’ll Enjoy
Here are a few other beginner-friendly project ideas you can try next:
-
How to Build a Wooden Mailbox – A sturdy outdoor project that teaches accurate layout and assembly.
-
Build a Simple Wooden Toolbox – A classic beginner project and a great way to organize your tools.
-
DIY Display Case – Learn clean joinery with a project that looks great in any room.
-
Craft a Kids’ Stool in 5 Steps – A quick build that teaches essential cutting and measuring skills.
These projects help you grow your skills while creating something you’ll enjoy for years to come.
You got this!
 Craft it. Shape it. Own it!
 Need More Plans?
 Click here to learn more about Ted’s Woodworking Plans.
If you want access to hundreds of additional woodworking projects and detailed tutorials, check out my full review of Ted’s Woodworking Plans.
It’s packed with step-by-step builds that are perfect for weekend projects.

 Turn Your Woodworking Passion Into Income
Click here to learn more about Wealthy Affiliate.
SawdustSmarty.com started as a small hobby —
and it only grew once I finally learned how to build a real website.
If you’ve ever thought about turning woodworking into a side income, the training at Wealthy Affiliate is what I personally recommend.
