
A Brief History of Windmills
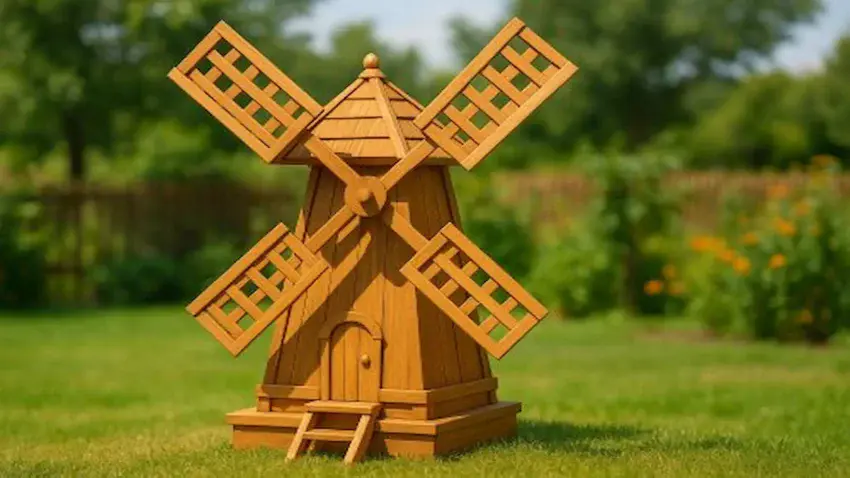
Building a wooden windmill yard decoration is one of those projects that looks impressive in the backyard but is surprisingly fun and beginner-friendly to make. With just a few basic tools, some scrap boards, and a free afternoon, you can create a charming piece of outdoor décor that shows off your craftsmanship and adds personality to any garden or patio space. In this guide,
I’ll walk you through each step of the build — from cutting the angled panels to assembling the blades —
so you can build a windmill that’s sturdy, good-looking, and built to last.

⭐ Tools That You Will Need
Before you get started on this wooden windmill project, it helps to have a few reliable tools on hand. I use these constantly in the shop because they make cutting, shaping, and assembling the parts a whole lot smoother. Nothing fancy here — just solid, everyday tools that make the build easier and help you get cleaner results.
Here are the three I reach for the most:
🌟 Amazon Product Suggestion:

✔️ STANLEY FATMAX 25-Foot Tape Measure
A tough, reliable tape measure built for real job-site use. The STANLEY FATMAX 25′ delivers crisp easy-read markings, a strong standout, and the perfect length for woodworking and outdoor projects.
Why it’s great:
✔️ Heavy-duty, long-lasting construction
✔️ Easy-read numbers for quick measuring
✔️ 25-foot length covers indoor and outdoor builds
✔️ Smooth standout for measuring long boards solo
✔️ Trusted brand with thousands of great reviews
🌟 Amazon Product Suggestion:
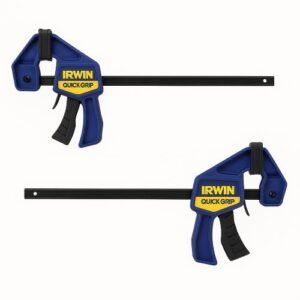
✔️ IRWIN QUICK-GRIP 6” One-Handed Mini Bar Clamp Set
(4-Pack)
These IRWIN Quick-Grip clamps are my go-to shop workhorses. Light, fast, and truly one-handed, they’re perfect for small builds like display cases, shelves, frames, and trim. Even with their compact size, they deliver solid pressure, lock cleanly, release smooth, and won’t dent your walnut thanks to the non-marring pads. If you want clamps you’ll actually enjoy using — these are the ones.
Why it’s great:
✔️ One-handed operation makes positioning and clamping effortless
✔️Strong, consistent grip for small cabinet and display case builds
✔️Soft, non-marring pads protect delicate woods like walnut and cherry
✔️Lightweight design lets you run several clamps at once without fatigue
✔️Perfect for tight spots where full-size bar clamps won’t fit
✔️Extremely reliable — no slipping, no bending, no cheap-plastic flex
✔️Great for beginners and pros who want fast, frustration-free clamping
🌟 Amazon Product Suggestion:
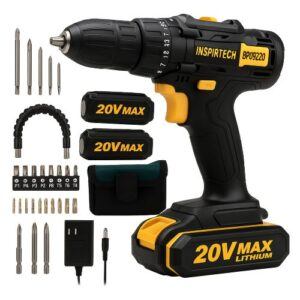
✔️ INSPIRITECH 20V Cordless Drill
(My Personal Choice!)
This is the cordless drill I use in my own shop, and it’s been rock-solid. The INSPIRITECH 20V kit includes two batteries, a charger, drill/driver bits, a flexible extension, and a handy tool bag. With 24 torque settings and a comfortable grip, it’s perfect for mailbox builds, repairs, and everyday woodworking.
Why it’s great:
✔️ Two 20V batteries — work nonstop
✔️ Includes bits, extension, and tool bag
✔️ Lightweight and easy to control
✔️ Strong enough for outdoor projects
✔️ Affordable, complete starter kit
🪚 Step 1: Cut the Body Panels
The main tower of your wooden windmill is made from a series of angled panels that form a tapered shape. You can build this with four, six, or eight panels, but most beginners stick with six because it gives a smooth, rounded look without complicated angles.
Start by cutting your boards to the length you want the windmill to be (most small yard windmills fall between 18″–24″ tall). Once you’ve got the lengths set, it’s time to cut the bevels along each edge.
A simple 10–15° bevel is usually enough for the panels to join nicely without gaps.
Take your time here — the cleaner your bevels are, the nicer the windmill body will fit together later.
A jigsaw will work just fine, but if you have a table saw, this part goes much faster.
👉👉 Pro Tip: Cut all your panel pieces slightly long on the first pass.
Once they’re beveled, clamp them together and trim the tops perfectly even.
This gives your windmill a cleaner, tighter fit — especially where the roof sits.
🔨 Step 2: Assemble the Windmill Body
With all your beveled panels cut, it’s time to bring the tower to life.
Lay the panels out in order, bevels facing inward, and begin joining the edges one at a time.
Wood glue does most of the heavy lifting here, but adding a few brad nails or small screws along the seams will keep everything aligned as it dries.
Work your way around the tower, connecting each panel until the body closes up into a tapered shape. Don’t worry if the bottom isn’t perfectly even yet — you’ll trim that flush once the glue sets.
Focus on tight seams and keeping the body straight from top to bottom.
If you cut clean bevels in Step 1, this part will come together easier than you expect.
👉👉 Pro Tip: Use painter’s tape as a clamp when joining the beveled seams. Lay the panels face-down, tape the seams together, flip the assembly upright, and roll it into shape. It keeps the joints tight without wrestling with a dozen clamps.
🪵 Step 3: Build the Windmill Roof
The roof gives your windmill that classic tapered look, and it also hides the top edges of your body panels. Most small yard windmills use a simple pyramid-style roof, which you can make from four or six small triangular panels.
Cut each panel with the same angle so they meet cleanly at the peak.
A miter saw makes this part easy, but a jigsaw will still get the job done.
Once your panels are cut, glue and clamp them together to form the roof cap.
When it dries, test-fit it on the tower— it should sit snugly without wobbling.
If you want a cleaner look, you can sand the seams smooth or add a small finial (a round wooden knob) at the top for a decorative touch.
👉👉 Pro Tip: Before gluing the roof together, label the inside of each panel so you know the order they fit best. Tiny differences in angle cuts can make one layout tighter than another, and labeling saves you from trial-and-error once the glue is flowing.
⚙️ Step 4: Build the Propeller Blades
The blades are the star of the whole windmill, so this is where a little patience really pays off.
Start by cutting four identical blade arms—long, narrow pieces that taper slightly toward the tips.
Then cut the lattice-style crosspieces that give the blades their classic windmill look.
Attach the crosspieces to each arm using wood glue and small brads, making sure the spacing is consistent from blade to blade. Uniformity matters here: the more balanced your blades are, the smoother the windmill will spin once it’s assembled.
Once the blades are built, lightly sand the edges and faces to remove splinters.
Then set them aside—we’ll mount them to the hub in the next step.
👉👉 Pro Tip: Lay all four blades side by side while building them. This makes it easy to keep the length, taper, and lattice spacing consistent, ensuring better balance and a cleaner look once they’re spinning.
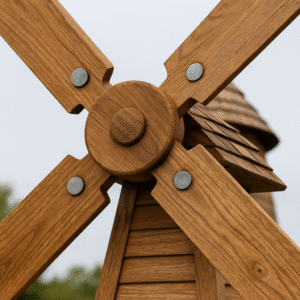
🔩 Step 5: Mount the Blades to the Hub
Now it’s time to bring those blades together into a working propeller.
Start by cutting a round or octagon-shaped hub—this is the center block that all four blades attach to. Drill a hole directly through the middle of the hub; this will hold the main pivot bolt later on.
Attach each blade arm to the hub using screws, bolts, or dowels—whatever style you prefer for this build. The important part is keeping all four blades spaced at perfect 90° angles from each other.
If the spacing is off, the windmill won’t spin smoothly and can wobble in the breeze.
Once everything is mounted, test-spin the assembly in your hand.
It should rotate easily without rubbing or catching.
If it feels unbalanced, remove a blade and shave down the heavier side slightly.
👉👉 Pro Tip:
Use a small spacer block between blades as you attach them. This guarantees perfect alignment and helps keep all four blades sitting at the same angle for smoother rotation.
🧱 Step 6: Build the Windmill Base
The base is what keeps your windmill upright, stable, and looking finished.
You can make it from a simple square or hexagon-shaped platform, or get fancy with decorative trim if you like. Choose a board thick enough to prevent tipping—¾” plywood or a solid piece of 1x lumber works great.
Cut the base to the size you want, then sand the edges smooth.
Once the tower body is dry from earlier steps, stand it upright and mark the outline on the base.
This helps you center it perfectly before gluing and screwing it down.
Make sure the tower is sitting straight—this is one of those “check it twice” moments that makes a huge difference in how the finished piece looks.
👉👉 Pro Tip: Add small felt pads or rubber feet to the bottom of the base. They keep the wood off the ground, prevent moisture damage, and help the windmill sit flat on patios, porches, or garden stones.
🛠️ Step 7: Attach the Roof and Propeller Assembly
With the tower and base complete, it’s time to bring everything together.
Start by placing the roof cap on top of the windmill body.
It should sit snugly on the tapered panels—add a bead of wood glue inside the rim and secure it with a couple of small brad nails or screws to lock it in place.
Next, drill a hole through the center of the roof peak for the pivot bolt.
Slide the bolt through the roof and into the hub you built earlier, using washers on both sides so the propeller can spin freely. Tighten the nut just enough to hold everything together without restricting movement.
Give the blades a test spin—they should rotate smoothly with almost no resistance.
If they bind or wobble, loosen the nut slightly or add an extra washer to fine-tune the spacing.
👉👉 Pro Tip: Use a nylon lock nut on the pivot bolt. It keeps the tension consistent and prevents the nut from slowly backing off over time, especially if your windmill spins constantly in the breeze.
🎨 Step 8: Sand, Finish, and Weather-Proof
With the whole windmill assembled, it’s time to make it look sharp and protect it from the elements.
Start by giving the entire piece a light sanding with 120–220 grit sandpaper.
Knock down any sharp edges, smooth out glue squeeze-out, and clean up the blade assembly so everything feels consistent.
Next comes the finish.
For outdoor projects like this, a good exterior-grade stain or clear sealer goes a long way.
A natural cedar or golden-oak stain really brings out the grain, but you can go clear if you want the raw wood look. Apply your finish evenly with a brush or rag, let it soak in, then add a second coat for durability.
If your windmill will live outside full-time, follow up with a UV-resistant topcoat or spar urethane to help it handle sun, rain, and humidity.
👉👉 Pro Tip: Seal the bottom edges of the windmill body and base extra well. Those areas soak up moisture the fastest, and a little extra protection there will add years to the life of your project.
🌬️ Step 9: Check the Spin and Make Final Adjustments
With the finish dry, it’s time to give your windmill its first real test.
Set it in the yard, on the porch, or anywhere there’s a little breeze.
Watch how the blades turn—smooth, steady rotation means the alignment and balance are just right.
If the blades hesitate or wobble, loosen the pivot nut slightly, add a washer, or adjust the blade spacing. Sometimes even a tiny tweak makes a huge difference. Spin the blades by hand to feel for any rubbing points or tight spots.
Once everything spins freely, you’re in business. A well-balanced set of blades will catch even the smallest gust and keep your windmill turning without effort.
👉👉 Pro Tip: If your blades feel a little heavy, trim just a hair off the back side of the heaviest blade—not the front. This keeps the face looking clean while helping the propeller balance perfectly.
🌟 Step 10: Set It Up and Enjoy the View
Your wooden windmill is officially ready for its new home.
Pick a spot where it can catch a little breeze—near a garden bed, along a walkway, or right in the middle of the yard as a centerpiece.
Make sure the base sits flat and stable so the windmill stands straight and spins freely.
Take a moment to admire the craftsmanship.
You shaped the panels, built the blades, balanced the hub, and brought the whole thing together step by step. Whether you leave it natural or let the stain deepen over time, this piece adds charm and character to any outdoor space.
👉👉 Pro Tip: Give the pivot bolt a quick once-a-year check. A tiny drop of oil and a half-turn adjustment keeps the blades spinning smooth season after season.
✅ Final Thoughts…
Building a wooden windmill is one of those projects that looks impressive but comes together with simple tools and a bit of patience. From cutting the tapered body panels to balancing the blades, each step adds character to the final piece. And once it’s turning in the breeze, it becomes one of those handcrafted details people always stop to admire.
If you’re looking for another enjoyable weekend build, you might like How To: Display Case or my Artistic Whirligig Project, both great choices for sharpening your skills while creating something eye-catching. And if you want to keep leveling up your shop setup, the Essential Woodworking Tools Guide is a solid place to start.
No matter what you build next, keep experimenting, keep practicing, and most of all—keep having fun in the shop. There’s always another project waiting on the workbench.
 More Woodworking Projects You’ll Enjoy
Here are a few other beginner-friendly project ideas you can try next:
-
How to Build a Wooden Mailbox – A sturdy outdoor project that teaches accurate layout and assembly.
-
Build a Simple Wooden Toolbox – A classic beginner project and a great way to organize your tools.
-
DIY Display Case – Learn clean joinery with a project that looks great in any room.
-
Craft a Kids’ Stool in 5 Steps – A quick build that teaches essential cutting and measuring skills.
These projects help you grow your skills while creating something you’ll enjoy for years to come.
You got this!
 Craft it. Shape it. Own it!
 Need More Plans?
 Click here to learn more about Ted’s Woodworking Plans.
If you want access to hundreds of additional woodworking projects and detailed tutorials, check out my full review of Ted’s Woodworking Plans.
It’s packed with step-by-step builds that are perfect for weekend projects.

 Turn Your Woodworking Passion Into Income
Click here to learn more about Wealthy Affiliate.
SawdustSmarty.com started as a small hobby —
and it only grew once I finally learned how to build a real website.
If you’ve ever thought about turning woodworking into a side income, the training at Wealthy Affiliate is what I personally recommend.
