Skip to content
Woodworking Plans and Tutorials
Menu
  • Home
  • Build Guides & DIY Projects
    • Common Woodworking Mistakes Beginners Make
    • How To: Display Case
    • Woodworking Projects Guide
    • Craft A Kid’s Stool In 5 Steps
    • 🧰 DIY Wooden Tool Box: Step-by-Step Instructions
    • Diy Wood Projects For Beginners Step By Step
    • Birdhouse
    • Step-by-Step Instructions To Build Your First Wooden Clock
    • Woodworking Tools For A Beginner
  • Furniture & Home Projects
    • 🪑 DIY Wooden Bench For Indoor Or Outdoor Use
    • 🌿 How To Build A Simple Wooden Step Stool
    • 🪵 Build Your Own Rustic Coffee Table
    • How To Make Floating Shelves That Actually Stay Up
    • 📚 How To Build A Simple Bookshelf From Scratch
    • DIY Storage Crate With Handles
    • Building A Wood Planter Box
    • Wood Outdoor Furniture
    • Custom Wood Accent Wall
  • Decor & Creative Projects
    • How To Build A Wooden Whirligig (DIY Outdoor Woodworking Project)
    • Beginner’s Guide to Wood Inlay (Techniques, Tools & Tips)
    • Build Your Own Whirligig
    • Diy Wooden Wall Art Projects For Beginners
    • Miniature Birdhouse
  • Specialty Projects
    • How To Build A Wooden Boat
    • How To Make A Wooden Bench
    • How To Make A Wooden Table
    • How To Build A Wooden Rocking Chair
    • How To Build Your Own Wooden Mailbox: A Step-by-Step Guide
    • How To Make Simple Wooden Toys
    • How To Make A Wooden Windmill
    • 🔪 How To Make A Wooden Cutting Board
    • How To Make A Simple Wooden Picture Frame
    • Best Tools And Materials For Building A Jewelry Box
  • Woodworking Techniques & Tips
    • Basic Woodworking Skills Every Beginner Should Learn
    • How To Measure And Mark Wood Accurately
    • Common Mistakes To Avoid When Building A Clock
    • How To Finish Wood Properly: Staining, Sealing, and Protecting Your Project
    • How To Prevent Wood From Warping And Cracking
    • Mastering The Art Of Dovetail Joints
    • 🪓 Sharpening And Maintaining Your Woodworking Tools: A Complete Guide
    • Step-by-Step Guide To Cutting Wood With A Circular Saw
    • Top 5 Wood Joinery Methods Explained
    • Understanding The Difference Between Wood Chisels
    • Understanding Wood Grain: Why It Matters In Every Cut
  • Workshop Safety
    • 💨 Best Dust Collection Solutions For A Small Workshop
    • How To Organize A Small Woodshop For Maximum Efficiency
    • ⚙️ Power Tools Vs. Hand Tools
    • Precision Measuring Tools For Expert Woodworking
    • Top 5 Essential Tools Every Woodworker Needs (Beginner’s Guide)
    • Woodworking Safety In Small Shops
    • Woodworking Tools Plans For Beginners
  • Project Ideas & Inspiration
    • Best Selling Wood Projects At Craft Fairs And Online
    • DIY Wood Project Ideas
    • 🛠️ 10 Easy Woodworking Projects For Beginners
  • Courses & Affiliate Programs
    • 🌲 Teds Woodworking: Guide to Getting 16,000+ Wood Plans
    • Download 12,000 Free Shed Plans (Printable Shed Designs)
    • WoodProfits Review — Can You Really Earn $90,000/Year Woodworking From Home?
    • Wealthy Affiliate: My New Way Of Learning To Make Cash
  • About
    • About Wayne
    • Privacy Policy
    • Affiliate Disclosure
  • MAKE MONEY ONLINE
Menu
top-down view of a small wooden jewelry box open on a clean woodworking bench showing simple compartments and dividers minimal beginner design smooth wood grain warm natural sunlight soft shadows

How To Build A Wooden Jewelry Box With Dividers (Step-by-Step Guide)

Posted on March 24, 2026March 24, 2026 by Wayne

A jewelry box with dividers isn’t just more organized —
it instantly feels more professional and useful.

The good news?

Adding compartments doesn’t make the build much harder
if you keep the layout simple.

This step-by-step guide shows you exactly how to build a
clean, functional jewelry box with dividers using beginner-friendly methods.


👉 Why Add Dividers?

Before we build,
here’s why dividers are worth it:

  • Keeps rings, necklaces, and small items separated
  • Prevents scratching and tangling
  • Makes the box look more “finished”
  • Adds structure without much extra work

👉 This is the upgrade that takes your box from basic to impressive.


🪵 Materials You’ll Need

  • 1/2″ or 3/4″ wood for outer box
  • 1/4″ wood for dividers
  • Wood glue
  • Small hinges
  • Sandpaper (120–220 grit)
  • Optional: felt lining

🛠️ Tools

  • Saw (miter, circular, or hand saw)
  • Clamps
  • Square
  • Measuring tape
  • Optional: brad nailer

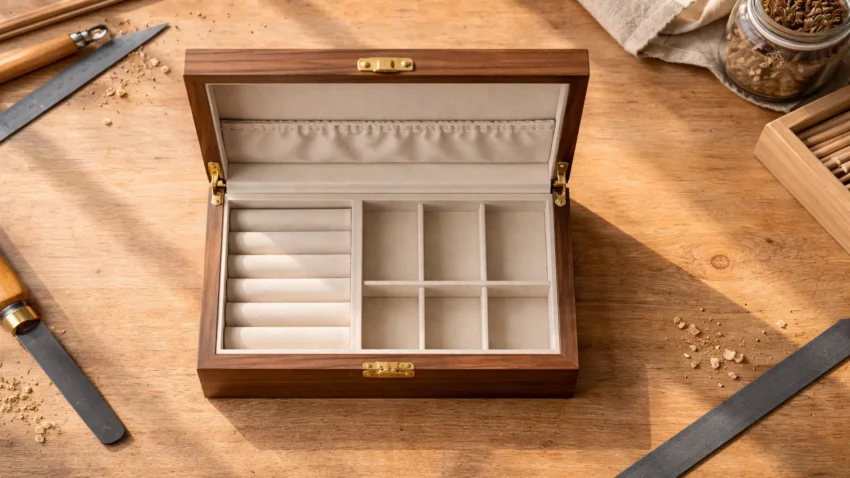
📐 Divider Layout Options (Keep It Simple)

Start with one of these:

Option 1: Basic Grid

  • 4 equal compartments
  • Easiest to build

Option 2: Mixed Layout

  • 1 large section + 3 small
  • More functional for jewelry variety

👉 Avoid overcomplicating this—tight fits matter more than fancy layouts.


🔨 Step-by-Step Build

1. Build the Outer Box First

  • Cut base and sides
  • Glue and clamp
  • Make sure everything is square

👉 Do NOT install dividers yet.


2. Measure the Interior Carefully

Once the box is assembled:

  • Measure inside width and length
  • Account for divider thickness

Critical Tip: This Is Where Most Mistakes Happen

Measure twice and cut once.

Or you’ll be measuring once…
and cussing twice.


3. Cut Divider Pieces

  • Use 1/4″ wood
  • Cut snug—not forced

You want a clean fit without bowing.


4. Dry Fit Everything

Before glue:

  • Test all pieces
  • Adjust if needed

👉 If it fits dry, it’ll fit perfectly glued.


5. Install Dividers

  • Apply a small amount of glue
  • Press into place
  • Clamp lightly if needed

Keep glue minimal — no squeeze-out mess.


6. Sand and Clean Up

  • Smooth all edges
  • Pay attention inside compartments

This is what people feel when they use it.


7. Attach Lid

  • Install hinges carefully
  • Pre-drill holes

Take your time — this is a visible detail.


8. Optional: Add Felt Lining

  • Cut to fit compartments
  • Glue lightly

This adds a premium finish instantly.


🎯 Common Mistakes to Avoid

  • Cutting dividers before measuring inside
  • Making compartments too small
  • Using too much glue
  • Skipping dry fit

👉 Precision matters more than speed here.


💡 Pro Tips For Cleaner Results

  • Sand divider edges before installing
  • Use a square when placing dividers
  • Keep compartments slightly larger than needed

Want More Beginner-Friendly Designs?
Check out:


👉 Easy Jewelry Box Plans For Beginners (Simple DIY Builds)


Final Thoughts…

Adding dividers is one of the easiest ways to upgrade your woodworking projects
without making them complicated.
It teaches precision, layout planning, and attention to detail —
all in a small, manageable build.

And once you’ve done it once,
you’ll start adding compartments to everything.

Keep building — each project gets better.

Come on man… You got this!


⚒️ Craft it. Shape it. Own it! ⚒️


Leave a Reply Cancel reply

Your email address will not be published. Required fields are marked *

Turn Your Passion Into Profit: Start A Home-Based Woodworking Business

Recent Posts

  • 🪵 Build Your Own Rustic Coffee Table
  • 🪓 Sharpening And Maintaining Your Woodworking Tools: A Complete Guide
  • 🪑 DIY Wooden Bench For Indoor Or Outdoor Use
  • 🧰 DIY Wooden Tool Box: Step-by-Step Instructions
  • 🛠️ 10 Easy Woodworking Projects For Beginners

Categories

  • About
  • Build Guides & DIY Projects
  • Courses & Affiliate Programs
  • Decor & Creative Projects
  • Furniture & Home Projects
  • Project Ideas & Inspiration
  • Specialty Projects
  • Woodworking Techniques & Tips
  • Woodworking Tools
  • Affiliate Disclosure
  • Privacy Policy
© 2026 Woodworking Plans and Tutorials | Powered by Superbs Personal Blog theme