
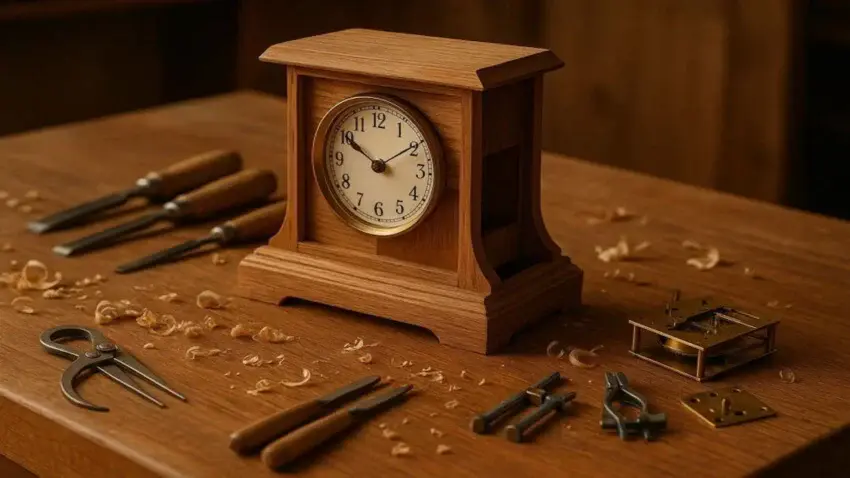
Building your own wooden clock may sound like a complex project, but with the right guidance, it becomes an incredibly rewarding way to sharpen your woodworking skills and create something truly unique. In this guide, Step-by-Step Instructions To Build Your First Wooden Clock, you’ll learn how to tackle precision work that blends craftsmanship with creativity. From choosing the right wood and tools to assembling the movement and adding the finishing touches, these step-by-step instructions will walk you through every stage so you can confidently bring your ticking masterpiece to life.

🪚 Tools and Parts I Use When Building a Wooden Clock
Before you dive into the build, here are a few items that will make the process smoother,
cleaner, and a whole lot more enjoyable…
These are the same essentials I reach for when working on detailed woodworking projects —
like building a wooden clock.
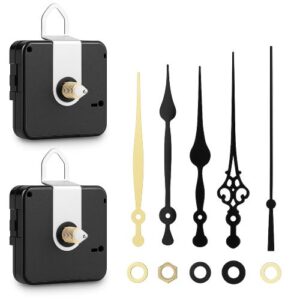
Quartz Clock Mechanism Kit – 2-Pack with 5 Sets of Hands
A reliable clock movement is the heart of any wooden clock build.
This quartz mechanism keeps accurate time, installs easily, and lets your craftsmanship take center stage.
🌟 Amazon Product Suggestion:
✔ Quartz Clock Mechanism Kit – 2-Pack with 5 Sets of Hands
(Silent Sweep Movement)
When you’re building a wooden clock — especially your first one — this little kit is the secret weapon that makes the whole project come alive. It includes two quartz clock mechanisms plus five complete sets of hands, giving you plenty of flexibility to match the style of your clock face. No salvaging old parts, no guessing what fits — this kit is made for DIY clock builders and fits most wood thicknesses right out of the box.
The silent sweep design keeps your clock running smooth and quiet, and the included mounting hardware makes setup simple and frustration-free.
Why it’s great:
✓ Includes two clock movements — perfect for backups or second projects
✓ Comes with 5 sets of hands in different styles
✓ Silent sweep mechanism — smooth movement with no ticking
✓ Fits most DIY wooden clock faces and panel thicknesses
✓ Complete hardware included — easy installation for beginners
STANLEY FATMAX 25-Foot Tape Measure
Accurate measurements are key when fitting clock parts and laying out clean joinery.
This tape measure is sturdy, easy to read, and reliable for detailed woodworking projects.
🌟 Amazon Product Suggestion:

✔️ STANLEY FATMAX 25-Foot Tape Measure
A tough, reliable tape measure built for real job-site use. The STANLEY FATMAX 25′ delivers crisp easy-read markings, a strong standout, and the perfect length for woodworking and outdoor projects.
Why it’s great:
✔️ Heavy-duty, long-lasting construction
✔️ Easy-read numbers for quick measuring
✔️ 25-foot length covers indoor and outdoor builds
✔️ Smooth standout for measuring long boards solo
✔️ Trusted brand with thousands of great reviews
INSPIRITECH 20V Cordless Drill
A cordless drill makes assembling clock parts faster and more precise,
especially when drilling pilot holes or mounting hardware.
This one offers plenty of power without feeling bulky on detailed projects.
🌟 Amazon Product Suggestion:

✔️ INSPIRITECH 20V Cordless Drill
(My Personal Choice!)
This is the cordless drill I use in my own shop, and it’s been rock-solid. The INSPIRITECH 20V kit includes two batteries, a charger, drill/driver bits, a flexible extension, and a handy tool bag. With 24 torque settings and a comfortable grip, it’s perfect for mailbox builds, repairs, and everyday woodworking.
Why it’s great:
✔️ Two 20V batteries — work nonstop
✔️ Includes bits, extension, and tool bag
✔️ Lightweight and easy to control
✔️ Strong enough for outdoor projects
✔️ Affordable, complete starter kit
Materials & Tools Needed
Materials
-
Hardwood boards (walnut, cherry, maple, or oak)
-
Clock movement kit (with hands, hardware, and mounting nut)
-
Wood dowels (optional, depending on design)
-
Sandpaper (120, 220, 320 grit)
-
Wood finish (oil, polyurethane, or shellac)
-
Wood glue
-
Hanging hardware (if wall-mounted)
Tools
-
Table saw or circular saw
-
Jigsaw or bandsaw
-
Drill or drill press
-
Clamps (mini or medium)
-
Orbital sander
-
Chisels (for cleanup or detail work)
-
Measuring tape & square
-
Pencil or marking knife
🛠️ Step 1: Choose Your Wood and Gather Your Tools
Selecting the right materials is the first big step toward building a wooden clock you’ll be proud of.
Your wood choice sets the tone, durability, and overall character of the project —
So, pick something that matches the look you’re going for.
Great wood options include:
-
Walnut – dark, rich, and perfect for a classic clock face
-
Oak – strong, sturdy, and full of character
-
Cherry – smooth grain with a warm reddish glow as it ages
Each species brings its own personality, so choose the one that fits your style and the room where your clock will hang.
Next, gather the essential tools.
You don’t need a full workshop for this project — just the basics:
-
A reliable saw for cutting your wood
-
Chisels for small cleanups and detail shaping
-
Sandpaper in a few grits for smooth finishes
-
A drill for precise movement holes
-
A measuring tape to keep all your dimensions accurate
These tools will give you everything you need to get started without overcomplicating the project.
Always remember, Safety first!
👉👉Pro Tips: Always wear your goggles, use gloves when needed, and keep your workspace bright and organized. A clean shop makes a safer shop — and helps you enjoy the build without any surprises.
🛠️ Step 2: Cut and Shape Your Clock Components
With your wood selected and tools ready, it’s time to start bringing your clock to life.
Begin by measuring and marking the outline of your clock face.
This can be round, square, or any shape that fits the style you’re going for.
Precision matters here — accurate marking now prevents headaches later.
Use your saw (jigsaw, bandsaw, or table saw depending on the design) to cut out the clock face.
Take your time and follow your lines closely.
After the face is cut, gently refine the edges using sandpaper or a sanding block.
You want the shape to look clean, smooth, and intentional.
If your clock design includes trim pieces, raised edges, or decorative cutouts, now’s the time to shape those elements as well. Keep your chisel work controlled and light — a little goes a long way when shaping details.
Once everything is cut and shaped, do a quick test layout.
Make sure your hands, movement unit, and face size feel balanced.
Any adjustments are much easier to make now before moving into drilling and assembly.
👉👉 Pro Tip: Cutting curves? Let your saw do the work. Move slowly, avoid forcing the blade, and make relief cuts when needed. You’ll get cleaner lines and far fewer burn marks on the wood.
🛠️ Step 3: Drill the Center Hole for the Clock Movement
Now that your clock face is cut and shaped, it’s time to prepare it for the movement.
The center hole is the heart of your clock — it determines how straight the hands sit,
how smoothly they move, and how professional your final build looks.
- Start by finding the exact center of your clock face.
Use your measuring tape to mark equal distances from the edges,
or use a straightedge to draw light intersecting lines.
The point where the lines meet is your exact center. - Once marked, use a drill with the appropriately sized bit
(usually matching the shaft diameter of your clock movement).
Drill slowly and let the bit do the work —
you want a clean, precise hole without splintering the front surface. - After drilling, test-fit the movement.
It should slide in cleanly without forcing it.
If the hole needs minor adjustment,
lightly sand or widen it with a small file until the fit is perfect.
👉👉 Pro Tip: Place a scrap piece of wood under your clock face when drilling.
This prevents blowout on the backside and leaves you with a crisp, clean hole every time.
🛠️ Step 4: Attach the Clock Movement and Hands
With your center hole drilled and clean, it’s time to bring your wooden clock to life.
Start by inserting the clock movement from the back of the clock face.
Make sure the shaft slides through smoothly and sits square against the wood.
If it feels tilted or uneven, adjust the hole lightly until the fit is perfect.
Secure the movement using the included washer and mounting nut.
Tighten it firmly, but don’t overdo it —
You want the movement locked in place without compressing or damaging the wood.
Next, it’s time to install the hands.
Most kits include three: the hour, minute, and second hand
(or decorative variations).
Attach them in that order:
-
Hour hand – push gently onto the shaft
-
Minute hand – slide over the center pin and secure with the small nut if provided
-
Second hand – press lightly so it seats without bending
Make sure the hands move freely without touching each other.
If they rub or snag, gently bend them upward or downward until they sweep cleanly.
👉👉 Pro Tip: After attaching the hands, rotate them through a full 12-hour cycle by hand.
This helps you catch any rubbing issues early — before you hang the clock or add the battery.
🛠️ Step 5: Sand, Finish, and Bring Out the Wood’s Natural Beauty
With the movement installed and the hands fitted correctly,
it’s time to give your clock the professional finish it deserves.
Start by sanding the entire face and any trim pieces.
Work through the grits — typically 120 → 220 → 320 —
to remove tool marks, smooth the edges, and prep the surface for finishing.
Pay special attention to the outer rim and any decorative cuts or raised features.
These areas tend to show roughness the most,
and a few extra passes with fine-grit sandpaper go a long way.
Once everything feels smooth to the touch, wipe the surface clean of all dust.
Then choose the finish that matches your style:
-
Oil finishes (Danish oil, tung oil) — warm, natural, easy to apply
-
Polyurethane — durable, protective, great for a glossy or satin look
-
Shellac — traditional, fast-drying, great for enhancing grain
Apply thin, even coats and let each one dry completely before adding another.
The finish you choose will deepen the grain, enrich the color,
and give your wooden clock that polished, handcrafted look.
👉👉 Pro Tip: After your first coat dries, lightly buff the surface with 320–400 grit sandpaper or a fine abrasive pad. This creates a silky-smooth final finish that feels as good as it looks.
🛠️ Step 6: Assemble and Test Your Clock
Once your finish is dry and everything looks smooth and polished,
it’s time to bring your wooden clock together and make sure it runs the way it should.
Start by reinstalling the clock movement if you removed it for finishing.
Secure it firmly and double-check that the shaft is centered and straight.
Next, reattach the clock hands in the correct order — hour, minute, then second.
Make sure each one seats properly and that they move freely without rubbing.
Even the slightest bend can cause the clock to stop or run inconsistently,
so take a moment to verify clearance all the way around.
Insert the battery and listen for the movement to start.
Watch the hands sweep for a minute or two to confirm everything is running smoothly.
If something catches or stalls, gently adjust the hands until the movement feels effortless.
Finally, place the clock upright and watch it run for 5–10 minutes.
This short test ensures your movement is seated correctly and
your hands are aligned before you mount the clock on the wall or display it.
👉👉 Pro Tip: If your hands aren’t syncing correctly at the top of the hour, remove them and reset them to the 12 o’clock position. Starting from a perfect alignment keeps your clock accurate and visually clean.
🛠️ Step 7: Mount, Display, and Enjoy Your Finished Clock
With your clock fully assembled and tested, it’s time for the best part — putting it on display.
Whether it’s hanging on the wall, sitting on a mantel, or becoming the centerpiece of a shelf,
your handmade wooden clock deserves a spot where it can shine.
If your clock is wall-mounted, attach a secure hanger or keyhole bracket on the back.
Make sure it’s centered so the clock hangs straight. Use a level when marking your wall —
nothing throws off a beautiful handmade piece like a crooked placement.
For freestanding or shelf clocks, check that the base is even and stable.
A small felt pad or rubber bumper can keep it from sliding and protect your furniture.
Once it’s in place, step back and admire your work.
You’ve just built a fully functional, handcrafted wooden clock —
a project that combines precision, creativity, and craftsmanship.
It’s a piece you can be proud of for years to come.
👉👉 Pro Tip: Want your clock to truly stand out? Pair it with a contrasting backdrop — a light-colored wall for dark woods like walnut, or a warm-toned surface for lighter woods like maple or cherry.
It adds visual depth and makes your craftsmanship pop.
Final Thoughts…
Building your first wooden clock is one of those projects that looks intimidating at first —
but once you break it down into simple steps, it becomes a fun, rewarding experience that sharpens your skills and leaves you with a piece you can proudly display.
From choosing the right wood to installing the movement and adding the final touches, every part of the process teaches you something new about craftsmanship and attention to detail.
The best part?
No two clocks ever look the same.
You’ve created something functional, personal, and built entirely by hand —
a project that blends creativity with precision in a way few builds can match.
 More Woodworking Projects You’ll Enjoy
Here are a few other beginner-friendly project ideas you can try next:
-
How to Build a Wooden Mailbox – A sturdy outdoor project that teaches accurate layout and assembly.
-
Build a Simple Wooden Toolbox – A classic beginner project and a great way to organize your tools.
-
DIY Display Case – Learn clean joinery with a project that looks great in any room.
-
Craft a Kids’ Stool in 5 Steps – A quick build that teaches essential cutting and measuring skills.
These projects help you grow your skills while creating something you’ll enjoy for years to come.
You got this!
 Craft it. Shape it. Own it!
🔧 Need More Plans Or Ideas?
👉👉 Click here to learn more about Ted’s Woodworking Plans:
If you want access to hundreds of additional woodworking projects and detailed tutorials, check out my full review of Ted’s Woodworking Plans.
It’s packed with step-by-step builds that are perfect for weekend projects.

💡 Turn Your Woodworking Passion Into Income
👉👉 Click here to learn more about Wealthy Affiliate
SawdustSmarty.com started as a small hobby — and grew because I finally learned how to build a real website.
If you’ve ever thought about turning woodworking into a side business or income stream, the training at Wealthy Affiliate is hands-down what I recommend.
