
Keeping your tools razor-sharp isn’t just about getting cleaner cuts —
it’s about working safer, faster, and with way less frustration.
Sharpening woodworking tools is one of those skills that separates a struggling beginner from someone who can build confidently and consistently.
When your chisels, plane irons, and edge tools glide through wood instead of fighting it, every project becomes smoother and a whole lot more enjoyable.
And the best part?
You don’t need fancy equipment or years of practice to get pro-level results —
You just need the right setup, the right technique, and a simple sharpening routine you can rely on.

🧰 Tools You’ll Need for Razor-Sharp Results
Sharp tools aren’t just safer — they’re more accurate, more enjoyable to use,
and far less likely to ruin a good piece of wood.
Whether you’re tuning up chisels, plane irons, or carving tools,
proper sharpening makes every cut feel controlled instead of forced.
The tools below help you restore a razor-sharp edge, maintain consistent bevels,
and keep your hand tools performing the way they should.
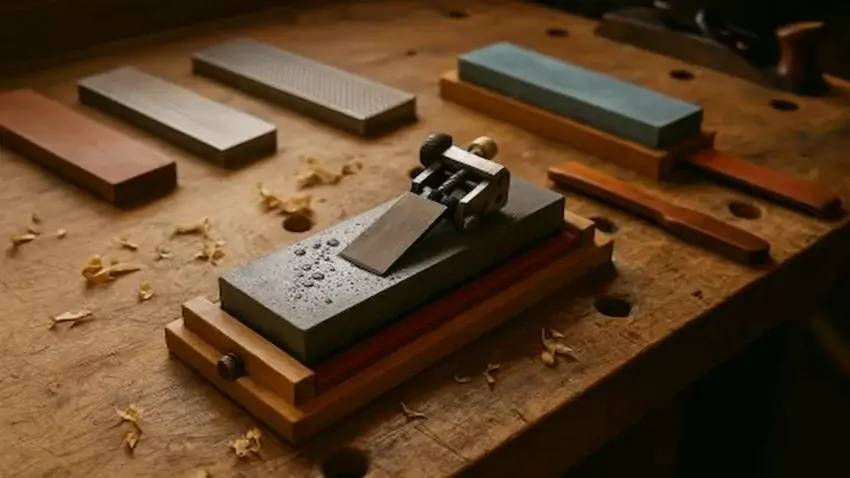
1️⃣ Diamond Sharpening Plate Set (Coarse/Medium/Fine)
If you want sharp chisels and plane blades, nothing beats a reliable set of diamond sharpening plates. This 5-piece kit gives you every grit you need — from fast material removal to ultra-fine polishing —
So, you can bring dulled edges back to life in minutes.
Durable, flat, and long-lasting, these plates make your sharpening routine consistent and frustration-free.
🌟 Amazon Product Suggestion:
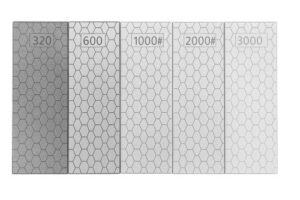
✔️ Diamond Sharpening Stone Set
(320–3000 Grit)
This 5-piece diamond sharpening stone set gives you every grit you need to keep your chisels, plane irons, and marking tools razor-sharp. From aggressive shaping at 320 grit to ultra-fine polishing at 3000 grit, these plates cut fast, stay flat, and never dish out like traditional water stones.
Whether you’re honing edge tools in the shop or touching up kitchen knives, these stones deliver consistent, reliable results without the mess.
Why It’s Great:
✔️Full grit range: 320, 600, 1000, 2000, 3000
✔️Faster cutting action than water stones
✔️Stays flat — no soaking, no flattening needed
✔️Perfect for chisels, plane irons, knives, and marking tools
✔️Compact, durable, and ideal for small shops
2️⃣ Honing Guide
A honing guide is the fastest way to get perfectly consistent sharpening results, even if you’re still learning the ropes. This precision jig locks your chisel or plane blade at the exact bevel angle you need, so every pass on the stone stays controlled, repeatable, and dead square.
No wobbling, no guessing — just crisp, razor-sharp edges every time.
🌟 Amazon Product Suggestion:
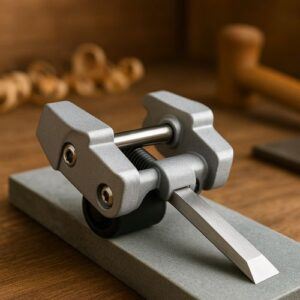
✔️ ATLIN Honing Guide
(Sharpening Jig for Chisels & Plane Blades)
The ATLIN Honing Guide is a rock-solid sharpening jig designed to lock your chisels and plane irons at the perfect angle for razor-sharp edges. Whether you’re new to sharpening or just want dead-consistent results, this jig keeps everything square, steady, and repeatable.
Why It’s Great:
✔️Perfect Sharpening Angles Every Time
✔️Works With Most Chisels & Plane Irons
✔️Heavy-Duty Aluminum Build
✔️Easy Setup & Adjustments
✔️Ideal for Water Stones, Diamond Plates & Oil Stones
3️⃣ Leather Strop With Compound
A leather strop is the final touch that takes your sharpening from “good” to “scary sharp.”
After honing on stones, the strop removes the last bit of burr and polishes the edge to a mirror finish. With a quality compound loaded on the leather, you can bring your chisels and plane irons to a razor-like shine in just a few quick passes.
🌟 Amazon Product Suggestion:
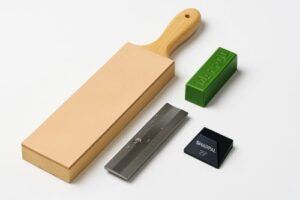
✔️ SHARPAL 205H Double-Sided Leather Strop Kit
This SHARPAL 205H strop kit is a rock-solid choice for putting the final razor polish on your chisels, plane irons, and carving tools. The double-sided genuine cowhide gives you a coarse side for fast refinement and a smooth side for mirror finishing.
The included green polishing compound makes it stupid-easy to get a razor edge, and the angle guide helps beginners hit the right bevel every time.
Why it’s great:
✔️ Double-sided strop for fast honing and final polish
✔️ Genuine cowhide for smooth, consistent results
✔️ Includes polishing compound & angle guide
✔️ Large 13.2″ size — plenty of room for plane irons and chisels
✔️ Perfect for woodworking tools, knives, and carving tools
🪚 Before You Start: Understanding Your Sharpening Workflow
Sharpening isn’t a single action — It’s a simple sequence.
Each tool you just saw plays a specific role:
The diamond plates remove dull metal and reshape the bevel,
The honing guide locks in your angle, so you get repeatable results, and
The leather strop finishes the job by polishing the edge to a razor shine.
Once you understand how these three steps flow together,
sharpening stops being intimidating and starts becoming automatic.
This routine works for chisels, plane irons, and most edge tools you’ll ever touch —
And after a few sessions, you’ll be able to restore a clean, buttery-smooth cutting edge in minutes.
🔪 Step 1: Prep Your Sharpening Station
Start by setting up a clean, stable area where your stones or diamond plates won’t move around.
Lay down a non-slip mat or a damp paper towel under your plates to keep everything steady.
If you’re using water stones, give them a quick soak according to the manufacturer’s instructions.
👉👉 PRO TIP: Keep a small spray bottle of water nearby —
it makes controlling the slurry easier and helps your plates or stones cut more efficiently.
🔪 Step 2: Set Your Bevel Angle With the Honing Guide
Slide your chisel or plane iron into the honing guide and tighten it just enough to hold the blade firmly. Use the angle guide or registration jig to set your bevel (25°–30° is standard for most edge tools).
Once it’s locked in, the guide will keep the blade perfectly flat so you can sharpen with confidence.
👉👉 PRO TIP: If you’re unsure which angle to use, stick with
25° for general work and 30° for heavy-duty chopping.
Consistency matters more than perfection.
🔪 Step 3: Start Sharpening on the Coarse Plate
Place the honing guide and blade onto your coarse diamond plate and begin with long, even strokes.
Let the plate do the work — no need to apply heavy pressure.
Your goal here is to reshape the bevel and remove any nicks or rounded edges.
Continue until you feel a slight burr forming along the back edge.
👉👉 PRO TIP: If the metal swarf starts to build up, hit the plate with a quick spritz of water.
A clean surface cuts faster and keeps your bevel crisp.
🔪 Step 4: Refine the Edge on the Medium Plate
Move to your medium-grit plate and continue sharpening with the same steady strokes.
This stage removes the coarse scratch marks and starts forming a cleaner, more polished bevel.
Keep going until the bevel looks uniform and the burr becomes more pronounced.
👉👉 PRO TIP: Always keep the honing guide flat on the plate —
Even a tiny lift at the end of a stroke can round your bevel and undo your progress.
🔪 Step 5: Polish the Bevel on the Fine Plate
Now switch to your fine diamond plate.
Use smooth, controlled strokes to erase the remaining scratches and refine the edge to a near-mirror finish.
This step is where the blade really starts to come alive.
Continue until the bevel looks glassy and the burr along the back is extremely thin.
👉👉 PRO TIP: If you’re struggling to see your progress, mark the bevel with a Sharpie before each grit.
The marker disappears as you hit the surface, showing exactly where you’re sharpening.
🔪 Step 6: Remove the Burr From the Back
Flip the blade over and lay the flat side (the back) perfectly flush on your fine plate.
Take a few gentle passes to remove the burr that formed during sharpening.
Don’t angle the blade — keep it dead flat.
You’re not sharpening the back; you’re just cleaning it up.
👉👉 PRO TIP: If the burr won’t disappear, go back to the medium plate for a couple of strokes,
then return to the fine plate. Burrs can be stubborn, but they always give up eventually.
🔪 Step 7: Strop the Edge to a Razor Finish
Move your blade to the leather strop and pull it backward along the leather, bevel side down.
Use light pressure and keep the angle consistent as you polish the bevel.
Flip the blade and give the back a few gentle passes as well.
The strop removes any microscopic burrs left over and brings the edge to a true, hair-shaving sharpness.
👉👉 PRO TIP: Always pull the blade away from the edge on a strop —
Pushing forward can slice into the leather and ruin both your strop and your edge.
🔪 Step 8: Test the Edge for Sharpness
After stropping, check your edge.
A properly sharpened chisel or plane iron should slice cleanly through end grain, shave thin curls off softwood, or even skim hair from your arm (if you’re brave).
The cut should feel smooth and controlled — no grabbing, tearing, or forcing.
👉👉 PRO TIP: If the edge feels “almost sharp,” it’s usually a sign you need a few more
light passes on the strop.
That last 10% is where the magic happens.
🔪 Step 9: Clean and Protect Your Tools
Wipe your blade dry and apply a thin coat of oil (camellia, mineral, or even a light machine oil) to prevent rust.
Do the same for your plates or stones if needed.
A clean, protected edge stays sharp much longer and keeps your sharpening equipment in top condition.
👉👉 PRO TIP: Store your freshly sharpened tools in a dry spot —
Humidity is the silent killer of razor edges.
🔪 Step 10: Establish a Simple Sharpening Routine
Don’t wait until your tools are painfully dull before sharpening again.
A quick tune-up on the fine plate and a few passes on the strop after each project will keep your edges performing like new.
Regular maintenance means faster work, cleaner cuts, and way less frustration in the shop.
👉👉 PRO TIP: If you sharpen a little and often, you’ll almost never need the coarse plate again —
Saving time, metal, and sanity.
🪵 Final Thoughts…
Keeping your edge tools sharp isn’t just a maintenance task —
It’s one of the most valuable woodworking skills you’ll ever learn.
With a simple setup and a consistent routine, you can keep your chisels, plane irons, and other cutting tools performing like new every time you step into the shop.
Sharpening woodworking tools doesn’t have to be complicated or intimidating —
It’s all about following the workflow and staying consistent.
 More Woodworking Projects You’ll Enjoy
Here are a few other beginner-friendly project ideas you can try next:
-
How to Build a Wooden Mailbox – A sturdy outdoor project that teaches accurate layout and assembly.
-
Build a Simple Wooden Toolbox – A classic beginner project and a great way to organize your tools.
-
DIY Display Case – Learn clean joinery with a project that looks great in any room.
-
Craft a Kids’ Stool in 5 Steps – A quick build that teaches essential cutting and measuring skills.
These projects help you grow your skills while creating something you’ll enjoy for years to come.
You got this!
 Craft it. Shape it. Own it!
🧰 Need More Woodworking Plans?
👉👉 Click here to learn more about Ted’s Woodworking Plans:
If you want hundreds of additional project ideas with clear step-by-step instructions, my full review breaks down exactly what you get inside Ted’s Woodworking Plans.
It’s a great resource if you like weekend builds, simple jigs, or classic shop projects.
Check out the full review here → Ted’s Woodworking Plans

💡 Turn Your Woodworking Passion Into Income
👉👉 Click here to learn more about Wealthy Affiliate
SawdustSmarty started as a simple hobby.
It grew because I finally learned how to build a real website — the right way. If you’ve ever thought about turning woodworking into a side business or income stream, Wealthy Affiliate is the training I personally recommend.
Click here to read more → Wealthy Affiliate
