

How to Prevent Wood From Warping and Cracking is something every woodworker has to
figure out sooner or later — usually after a project twists, splits, or cups when you least expect it.
Wood is strong and beautiful, but it’s also constantly reacting to changes in moisture,
temperature, and airflow.
If you don’t plan for that movement, even well-built projects can fail over time.
Whether you’re building a simple picture frame, a bookshelf, or outdoor furniture,
learning how to prevent wood from warping and cracking starts long before the first cut is made.
In this guide, you’ll learn what causes wood movement, how to properly store and acclimate lumber,
and the best ways to seal and protect your projects so they stay straight, stable,
and crack-free for years to come.

🪚 Tools That Help Prevent Wood Warping and Cracking
Wood movement problems usually start long before a project comes together.
Moisture content, improper storage, and uneven thickness can all lead to boards that
cup, bow, or crack over time.
These three tools help you control those variables, so your lumber stays stable
from the shop to the finished build.
🔹 TopTes Digital Wood Moisture Meter
One of the easiest ways to prevent wood from warping and cracking is
knowing when your lumber is actually ready to use.
A moisture meter takes the guesswork out of the process by letting you check boards before
milling, glue-ups, or finishing — Helping you avoid problems caused by excess moisture.
 Amazon Product Suggestion:

✔ TopTes Digital Moisture Meter
(TS-630)
Wood moisture plays a huge role in how a project turns out, especially when it comes to movement, cracking, and long-term stability. The TopTes TS-630 moisture meter makes it easy to check moisture levels before you cut, glue, or assemble your project—helping you avoid problems down the road.
This handheld meter uses pin-style probes to deliver fast, accurate readings on lumber, firewood, drywall, and other building materials. The large backlit LCD display is easy to read, even in a dim shop, and the color-coded indicators make it simple to tell whether wood is dry, borderline, or too wet to work with.
Why It’s Great:
✔ Quickly checks moisture levels before building
✔ Easy-to-read digital display with backlight
✔ Simple pin-style probes for accurate readings
✔ Helps prevent warping, splitting, and joint failure
✔ Great tool for lumber selection and shop projects
🔹 Heavy-Duty Wall-Mounted Lumber Storage Rack
Proper storage plays a huge role in keeping boards straight and crack-free.
A wall-mounted lumber rack keeps stock off the floor, evenly supported,
and properly spaced so air can circulate —
Reducing uneven drying that leads to twisting, cupping, and end-grain checks.
Amazon Product Suggestion:

✔ Lumber Storage Rack
Keeping lumber organized and off the floor makes a huge difference in both safety and workflow, and this wall-mounted lumber rack is a solid solution for small and mid-size shops. The heavy-duty steel construction is designed to hold long boards securely while keeping them visible and easy to access.
The folding arm design is a nice bonus, allowing you to free up wall space when the rack isn’t fully loaded. With multiple levels, it’s easy to separate different board lengths or species, helping your lumber stay straighter and easier to manage over time.
Why It’s Great:
✔ Heavy-duty steel construction for long boards
✔ Wall-mounted design keeps lumber off the floor
✔ Multiple levels for organizing different sizes
✔ Folding arms save space when not in use
✔ Great option for garage and home workshops
🔹 WEN 13-Inch Benchtop Thickness Planer
Flattening lumber correctly before a project goes together helps relieve internal stresses
that cause boards to move later.
A thickness planer allows you to bring boards to an even thickness on both faces,
creating balanced stock that’s far less likely to warp or crack over time.
Amazon Product Suggestion:
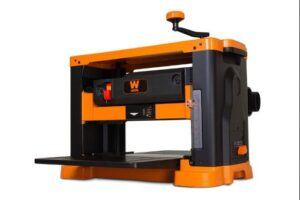
✔ WEN PL1326 15-Amp 13-Inch Spiral Benchtop Thickness Planer
If you’re working with rough lumber or want consistent thickness across your boards, a benchtop planer is a game-changer. The WEN PL1326 makes it easy to flatten and thickness boards accurately, helping you get better glue-ups, tighter joinery, and smoother surfaces before sanding.
The spiral cutter head delivers a cleaner cut with less tear-out compared to straight knives, especially when working with figured grain. Combined with a powerful 15-amp motor and compact benchtop footprint, this planer is a great fit for home shops that want professional-level results without dedicating floor space to a full-size machine.
Why It’s Great:
✔ Spiral cutter head reduces tear-out on tricky grain
✔ Produces consistent, accurate board thickness
✔ Powerful 15-amp motor handles hardwoods with ease
✔ Compact benchtop design for small shops
✔ Excellent upgrade for milling rough lumber at home
🌡️ Why Wood Warps and Cracks
Wood warps and cracks because it continues to react to moisture long after a tree is cut and dried.
As humidity levels change, wood absorbs or releases moisture,
and when that change happens unevenly, internal stress builds up.
Over time, that stress shows up as cupping, bowing, twisting, or end-grain cracks.
Moisture imbalance is the most common cause of wood movement.
Boards that dry too quickly on one side, or are moved between different environments,
are especially prone to warping.
End grain is also vulnerable because it releases moisture faster than the face of the board,
which is why cracks often start at the ends.
Milling can contribute as well.
When lumber is flattened or planed unevenly, internal stresses are released
and boards may move after the first few passes.
Once you understand these causes, preventing wood from warping and cracking becomes
far more predictable — And much easier to control.
🪵 Acclimating Lumber the Right Way
Before you start cutting or milling, lumber needs time to adjust to the environment where it will be used. Wood that comes straight from a lumberyard, home center, or delivery truck often has a different moisture level than your shop, and using it right away increases the risk of warping and cracking later.
To acclimate lumber properly, bring it into your shop and let it rest for several days —
Or longer for thicker stock.
Stack boards flat with space between them so air can circulate evenly on all sides.
This allows moisture to equalize slowly, reducing internal stress before you begin working the wood.
Taking the time to acclimate lumber may feel like a delay,
but it’s one of the simplest ways to prevent wood movement problems before they ever start.
 Pro Tip: Let the Wood Catch Up
Lumber needs time to adjust to your shop.
Rushing this step is one of the most common causes of warping after a project is built.
🗄️ Proper Lumber Storage to Prevent Warping
How lumber is stored plays a major role in whether it stays straight or slowly starts to move.
Boards left leaning against a wall, stacked unevenly, or resting on concrete floors are far more likely to cup, bow, or twist over time.
For best results, store lumber flat with even support along its length.
Keeping boards off the floor helps prevent moisture from being absorbed unevenly, while spacing boards allows air to circulate freely around them.
This keeps moisture changes gradual and consistent across the entire board.
Good storage doesn’t have to be complicated, but it does need to be intentional.
When lumber is properly supported and allowed to breathe, it stays flatter, more stable,
and far easier to work with when it’s time to build.
🪚 Storage Basics at a Glance
-
Store boards flat, not leaning
-
Keep lumber off concrete floors
-
Support boards evenly along their length
-
Allow airflow between stacked boards
📏 Milling Lumber Without Releasing Internal Stress
Rough lumber often contains internal stress that isn’t visible until you start cutting it.
If too much material is removed from one side at once, that stress can cause boards to move almost immediately, even if they looked straight before milling.
To reduce this risk, remove material gradually and alternate between faces when planing.
Taking light passes and allowing boards to rest between milling sessions gives the wood time to settle before final thicknessing.
This approach helps keep boards flatter and more stable throughout the build.
Milling with patience may take a little longer,
but it greatly reduces the chances of warping and twisting after parts are cut to size.
Wood that moves during milling is telling you something — slow down and let it settle.
🛡️ Sealing and Finishing to Reduce Cracking
Finishes don’t stop wood movement completely, but they do slow how quickly moisture enters and leaves the wood.
When moisture changes happen more gradually, wood is far less likely to crack or warp over time.
Sealing end grain is especially important, since it releases moisture much faster than the face of the board.
Applying finish evenly to all sides of a project also helps prevent uneven drying, which can lead to cupping or splitting.
This is particularly important for tabletops, panels, and wide boards.
A consistent, well-applied finish won’t eliminate movement, but it does help keep it controlled —
Allowing your projects to age naturally instead of failing prematurely.
🚫 Common Mistakes That Cause Wood to Warp and Crack
Even experienced woodworkers run into warping and cracking when a few key steps are skipped.
These are some of the most common mistakes that lead to wood movement problems.
-
Using lumber straight from the store without giving it time to acclimate to the shop
-
Storing boards leaning against a wall, which encourages bowing and twisting
-
Leaving lumber on concrete floors, where moisture transfer happens unevenly
-
Milling too aggressively, removing too much material from one side at once
-
Skipping end-grain sealing, allowing moisture to escape too quickly
-
Finishing only one side of a board or panel, leading to cupping over time
-
Ignoring seasonal humidity changes, especially in non–climate-controlled shops
Avoiding these mistakes won’t eliminate wood movement completely,
but it will dramatically reduce surprises after your project is built.
🧠 Final Thoughts… Control the Conditions, Control the Wood
Wood movement is part of woodworking, but it doesn’t have to ruin your projects.
Most warping and cracking problems come down to a few controllable factors:
- Moisture
- Storage
- Milling
- And finishing
When those are handled with intention, wood behaves far more predictably.
Take the time to let lumber acclimate, store it properly, mill it patiently, and finish it evenly.
Those small habits make a big difference and lead to projects that stay straight, solid,
and crack-free long after they’re built.
You don’t need perfect conditions — you just need consistent ones.
Get those right, and the wood will do the rest. 🪚
 More Woodworking Projects You’ll Enjoy
Here are a few other beginner-friendly project ideas you can try next:
-
How to Build a Wooden Mailbox – A sturdy outdoor project that teaches accurate layout and assembly.
-
Build a Simple Wooden Toolbox – A classic beginner project and a great way to organize your tools.
-
DIY Display Case – Learn clean joinery with a project that looks great in any room.
-
Craft a Kids’ Stool in 5 Steps – A quick build that teaches essential cutting and measuring skills.
These projects help you grow your skills while creating something you’ll enjoy for years to come.
You got this!
 Craft it. Shape it. Own it!
 Need More Plans?
Click here to learn more about Ted’s Woodworking Plans.
If you want access to hundreds of additional woodworking projects and detailed tutorials, check out my full review of Ted’s Woodworking Plans.
It’s packed with step-by-step builds that are perfect for weekend projects.

 Turn Your Woodworking Passion Into Income
Click here to learn more about Wealthy Affiliate.
SawdustSmarty.com started as a small hobby —
and it only grew once I finally learned how to build a real website.
If you’ve ever thought about turning woodworking into a side income, the training at Wealthy Affiliate is what I personally recommend.
