
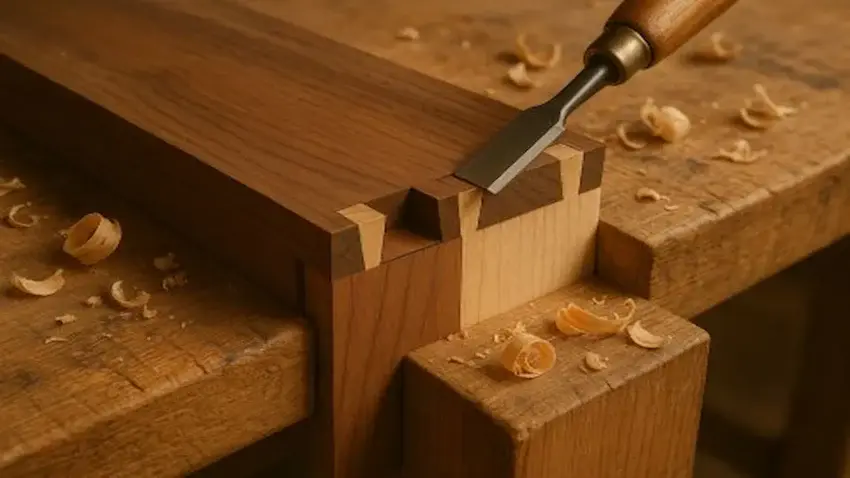
Mastering the art of dovetail joints is one of those woodworking skills that instantly levels up your craftsmanship.
These joints aren’t just strong—they’re downright beautiful when done right.
Whether you’re building drawers, keepsake boxes, or fine furniture, dovetails add that
“Yeah, I built this” kind of pride.
In this guide, we’ll break everything down step-by-step so you can cut clean, tight-fitting dovetails without frustration, guesswork, or gaps big enough to park a truck in.

🪚 Why Dovetail Joints Matter in Woodworking
Dovetail joints are a signature mark of craftsmanship —
they lock together with incredible mechanical strength and look stunning when cut cleanly.
Woodworkers use them in drawers, boxes, and fine furniture because the joint resists pulling apart even without glue.
For beginners, learning dovetails is a huge confidence boost: once you understand the layout, marking, and cutting technique, the rest of your joinery skills fall into place.
This section will guide you through the fundamentals, so your pins and tails fit tight and look professional.
Olfa Hobby Saw 167B
When you’re working on small, detailed cuts, precision matters.
This hobby saw gives you clean control without tearing up delicate pieces.
🌟 Amazon Product Suggestion:
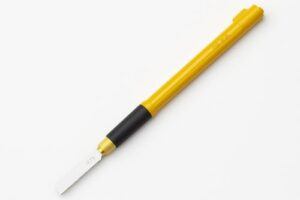
✔️ Olfa Hobby Saw 167B
A lightweight precision saw that’s perfect for beginners learning dovetail layout cuts.
The thin blade makes it easy to sneak into tight spaces, trim pins or tails, and clean up lines without removing too much material.
It’s surprisingly capable for its size and gives you great control for fine detail work.
Why It’s Great:
✔️ Thin, flexible blade for precision trimming
✔️ Ideal for beginners practicing dovetail layout cuts
✔️ Super affordable and extremely sharp
✔️ Great for tight spaces and cleanup cuts
Wooden/Aluminum Dovetail Marker
If you want tight, professional-looking joinery, precision is everything.
This dovetail marker makes laying out your cuts fast, easy, and consistent.
🌟 Amazon Product Suggestion:
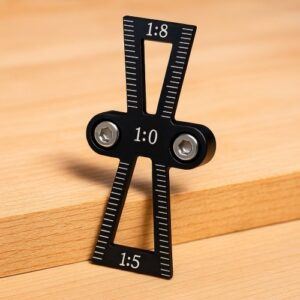
✔️Wooden/Aluminum Dovetail Marker
A dovetail marker is the secret to perfectly repeatable pins and tails.
This little tool ensures your angles are dead-on every time, eliminating guesswork and keeping your layout consistent across all your boards.
Whether you prefer 1:6 (softwood) or 1:8 (hardwood), this jig keeps your lines clean and accurate.
Why It’s Great:
✔️ Makes your dovetail angles perfectly consistent
✔️ Much easier than using a bevel gauge
✔️ Sharp reference edges for crisp marking-knife lines
✔️ A huge confidence booster for beginners
Hurricane 4-Piece Wood Chisel Set
When it comes to shaping, trimming, and fine-tuning your cuts, good chisels are a must.
This set offers solid steel, comfortable handles, and reliable performance.
🌟 Amazon Product Suggestion:
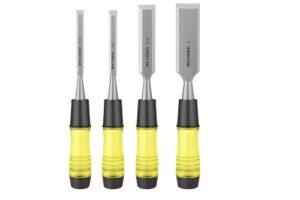
✔️Hurricane 4-Piece Wood Chisel Set
(CR-V Steel)
A sharp set of chisels is absolutely essential for dovetails, and this Hurricane set delivers serious performance on a budget. CR-V steel holds an edge well, the handles are tough, and the size selection hits every dovetail task — from cleaning waste to paring to your shoulder lines.
Why It’s Great:
✔️ Four essential sizes for dovetail work
✔️ CR-V steel stays sharp and durable
✔️ Comfortable handles with great control
✔️ Perfect balance of price and performance
Knew Concepts Dovetail Saw
Fine joinery demands a saw that’s light, stiff, and incredibly responsive.
This Knew Concepts model gives you that pro-level feel right out of the box.
🌟 Amazon Product Suggestion:
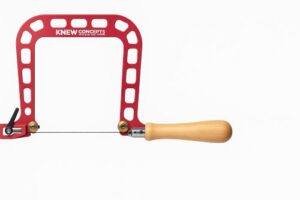
✔️Knew Concepts Dovetail Saw
If you want the Ferrari of dovetail saws, this is it. Knew Concepts is famous for ultra-rigid frames, insanely thin blades, and whisper-clean cuts. This is the saw that takes your dovetail work from
“pretty good” to “holy crap, that’s clean.”
Why It’s Great:
✔️ Ultra-lightweight frame = unbeatable control
✔️ Thin, razor-sharp blade for silky smooth cuts
✔️ Zero flex = more accuracy and cleaner shoulders
✔️ A long-term investment for serious joinery work
🪵 Step 1: Prepare Your Boards
Make sure your boards are flat, square, and cut to final size.
Dovetails only fit clean when your stock isn’t twisted or out of square.
A quick pass with a plane or sanding block keeps everything true.
👉👉 Pro Tip: Keep your end grain glassy smooth — it makes your layout lines sharper and easier to follow.
🧭 Step 2: Mark the Baseline
Use a marking gauge to scribe a baseline across the end grain of both boards.
This line tells you exactly how deep to cut your pins and tails.
Make it crisp — your chisel will register against this later.
👉👉 Pro Tip: Run the gauge lightly the first pass, then heavier on the second. You’ll get a cleaner, sharper shoulder.
✏️ Step 3: Lay Out the Tails with Your Dovetail Marker
Place your dovetail marker on the end grain and mark your tail angles using a marking knife.
Space them evenly or follow a traditional layout — your call.
These tail shapes are what give dovetails their signature look.
👉👉 Pro Tip: Always mark your pins from your tails, never the other way around.
It guarantees a perfect fit.
🪚 Step 4: Saw the Tails with the Knew Concepts Dovetail Saw
Cut just on the waste side of each line.
Keep the saw vertical and let the blade do the work — don’t muscle it.
That ultra-rigid frame will keep your kerf straight.
🪵 Step 5: Remove the Waste Between the Tails
Use your Hurricane chisels to chop halfway down your baseline, then flip and finish from the other side to avoid blowout.
Light, controlled taps are all you need.
👉👉 Pro Tip: Undercut the center slightly — NOT the edges.
It helps the joint pull tight when assembled.
📐 Step 6: Transfer the Tails to the Pin Board
Set the tail board on the end of your pin board and trace the profile with your marking knife.
This is where accuracy matters most — take your time and keep the boards locked in position.
🪚 Step 7: Saw the Pins with Your Dovetail Saw
Follow the knife lines carefully and stay just on the waste side.
Pins are smaller and more delicate than tails, so use a steady hand and a relaxed grip.
🔨 Step 8: Chop the Pin Waste
Use your chisels to clear out the waste areas between the pin walls.
Keep your chisel bevel facing the waste side and work slowly to avoid bruising your layout lines.
👉👉 Pro Tip: When paring to the baseline, sneak up on it with tiny cuts instead of trying to hit it in one go.
🧩 Step 9: Test-Fit the Joint
Slide the joint together gently — no hammers yet.
It should fit snug but not require Hulk strength.
If it’s too tight, lightly pare high spots.
If you overshoot, well…
That becomes the “rustic look.”
🪛 Step 10: Glue and Assemble
Once the fit is perfect, add a tiny amount of glue and clamp the joint until dry.
A clean dovetail will pull itself tight with almost no clamping pressure.
🔥Final Thoughts…
Cutting dovetail joints might look intimidating, but once you break it into simple steps,
the whole process becomes smooth, controlled, and honestly pretty fun.
Each joint you make teaches you something new —
cleaner saw cuts, tighter baselines, sharper chisels, and better overall layout.
As your hands get used to the rhythm, the confidence comes naturally,
and suddenly the fear of “messing it up” starts fading away.
Before long, you’ll be knocking out drawers, boxes, and small projects with the kind of craftsmanship
that makes people stop and stare.
Dovetails aren’t just a joint — they’re a skill that marks real progress in your woodworking journey.
Keep practicing, trust your layout lines, and enjoy watching your precision sharpen with every cut.
 More Woodworking Projects You’ll Enjoy
Here are a few other beginner-friendly project ideas you can try next:
-
How to Build a Wooden Mailbox – A sturdy outdoor project that teaches accurate layout and assembly.
-
Build a Simple Wooden Toolbox – A classic beginner project and a great way to organize your tools.
-
DIY Display Case – Learn clean joinery with a project that looks great in any room.
-
Craft a Kids’ Stool in 5 Steps – A quick build that teaches essential cutting and measuring skills.
These projects help you grow your skills while creating something you’ll enjoy for years to come.
You got this!
 Craft it. Shape it. Own it!
 Need More Plans?
 Click here to learn more about Ted’s Woodworking Plans.
If you want access to hundreds of additional woodworking projects and detailed tutorials, check out my full review of Ted’s Woodworking Plans.
It’s packed with step-by-step builds that are perfect for weekend projects.

 Turn Your Woodworking Passion Into Income
Click here to learn more about Wealthy Affiliate.
SawdustSmarty.com started as a small hobby —
and it only grew once I finally learned how to build a real website.
If you’ve ever thought about turning woodworking into a side income, the training at Wealthy Affiliate is what I personally recommend.
