

Building your own furniture is one of the coolest milestones in woodworking, and this guide will walk you through how to make a wooden table using simple tools, straight cuts, and beginner-friendly techniques. Whether you want a kitchen table, a work table, or a sturdy piece for the shop, this build hits that sweet spot between “easy enough for a weekend project” and “nice enough to proudly show off.”
We’ll break everything down step-by-step—cutting the boards, gluing up the top, assembling a rock-solid base, sanding it smooth, and finishing it so it looks like a piece you bought on purpose.
If you can measure, cut, clamp, and drill, you can knock this out and end up with a table that’ll last for years.

🪚 Is a Wooden Table a Good Beginner Project?
Absolutely — as long as you keep the design simple.
A basic wooden table uses straight cuts, glue joints, and common boards you can find anywhere.
No fancy joinery, no complicated curves, no intimidating techniques.
If you’re comfortable measuring, cutting, clamping, and drilling pilot holes, you already have most of the skills you need. Everything else is patience, layout, and letting the glue dry without messing with it
(the hardest part for all of us).
This project is perfect for beginners because it teaches you the fundamentals that show up in nearly every woodworking build: accuracy, alignment, stability, and surface prep.
🔧 Essential Tools for Building a Wooden Table
Before we start cutting boards and gluing up the tabletop, here are three tools that will make this build go smoother, cleaner, and way less frustrating.
These are the ones I reach for on almost every furniture project, and they’ll carry you through every step of this table.
📏 Tape Measure
A solid tape measure is the backbone of any furniture build.
Accurate cuts, square frames, and a flat tabletop all start with measurements you can trust.
Look for one with a standout that doesn’t collapse easily and clear, easy-to-read markings.
🌟 Amazon Product Suggestion:

✔️ STANLEY FATMAX 25-Foot Tape Measure
A tough, reliable tape measure built for real job-site use. The STANLEY FATMAX 25′ delivers crisp easy-read markings, a strong standout, and the perfect length for woodworking and outdoor projects.
Why it’s great:
✔️ Heavy-duty, long-lasting construction
✔️ Easy-read numbers for quick measuring
✔️ 25-foot length covers indoor and outdoor builds
✔️ Smooth standout for measuring long boards solo
✔️ Trusted brand with thousands of great reviews
🗜️ Clamps
You cannot build a table without clamps.
They keep your tabletop boards tight during glue-up and hold aprons and legs square while you assemble the base.
More clamps = better results.
If you only have a few, this project is the perfect excuse to add a couple more to the rack.
🌟 Amazon Product Suggestion:
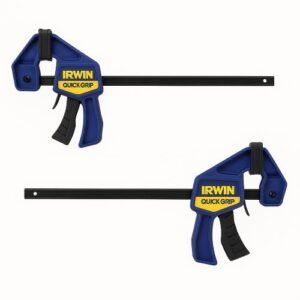
✔️ IRWIN QUICK-GRIP 6” One-Handed Mini Bar Clamp Set
(4-Pack)
These IRWIN Quick-Grip clamps are my go-to shop workhorses. Light, fast, and truly one-handed, they’re perfect for small builds like display cases, shelves, frames, and trim. Even with their compact size, they deliver solid pressure, lock cleanly, release smooth, and won’t dent your walnut thanks to the non-marring pads. If you want clamps you’ll actually enjoy using — these are the ones.
Why it’s great:
✔️One-handed operation makes positioning and clamping effortless
✔️Strong, consistent grip for small cabinet and display case build
✔️Soft, non-marring pads protect delicate woods like walnut and cherry
✔️Lightweight design lets you run several clamps at once without fatigue
✔️Perfect for tight spots where full-size bar clamps won’t fit
✔️Extremely reliable — no slipping, no bending, no cheap-plastic flex
✔️Great for beginners and pros who want fast, frustration-free clamping
🪚 Jigsaw
A jigsaw handles all your basic cutting here—legs, aprons, and trimming the tabletop to final length.
It’s lighter and easier to control than a circular saw, which makes it perfect for beginners or for anyone building in a small shop.
🌟 Amazon Product Suggestion:

✔️ SKIL 6-Amp Corded Jig Saw
A dependable jigsaw with solid power and smooth control. The SKIL 6-Amp delivers clean curves, fast cuts, and easy bevel adjustments, making it a great all-around tool for woodworking and DIY projects.
Why it’s great:
✔️Powerful 6-amp motor for hardwoods and plywood
✔️4-stage orbital action for smooth or aggressive cutting
✔️Bright HALO LED for clear visibility on cut lines
✔️Tool-free bevel adjustment for quick angled cuts
✔️ Comfortable grip with low vibration for better accuracy
Step 1: Plan Your Table Size and Cut List
Start by deciding the exact size of the table you want to build.
Standard dining height is around 30″, but the length and width depend on your space and how many people you want to seat.
Sketch out a quick plan with your final height, tabletop dimensions, apron lengths, and leg size.
From that, build a simple cut list so you know exactly what boards you’ll need and how long each piece should be.
👉👉 PRO TIP: Keep your tabletop between 28″–36″ wide for an easier build.
It clamps better, sands better, and won’t fight you during glue-up.
Step 2: Cut the Legs, Aprons, and Tabletop Boards
With your cut list ready, start breaking down your lumber.
Cut the legs to final height first so everything else references them.
Then cut your apron boards to length, remembering to subtract the thickness of your legs so your final table matches your planned dimensions.
Finally, cut your tabletop boards slightly longer than needed — you’ll trim the ends perfectly after glue-up.
👉👉 PRO TIP: Label every piece with a pencil as you cut it (LF = left front leg, RA = right apron, etc.).
When it’s time to assemble the frame, those tiny letters save you huge headaches.
Step 3: Lay Out and Glue Up the Tabletop
Arrange your tabletop boards on a flat surface and shuffle them around until the grain flow looks good. Flip the boards on edge, apply a consistent bead of wood glue to each mating surface, then clamp everything together.
Tighten the clamps slowly and evenly so the boards pull together without shifting.
Check the top with a straightedge as you go to keep it as flat as possible.
👉👉 PRO TIP: Alternate the direction of the growth rings on each board (one up, one down, repeat). This helps reduce cupping and keeps the tabletop flatter over time.
Step 4: Scrape, Trim, and Flatten the Tabletop
Once the glue is fully dry, remove the clamps and scrape off any squeeze-out with a chisel or putty knife. Use your jigsaw and a straightedge (or a guide) to trim the ends of the tabletop square and flush.
Then sand the entire surface, starting with 80-grit to level any high spots, followed by 120-grit and finally 180 or 220 for a smooth, ready-to-finish surface.
👉👉 PRO TIP: Lightly draw pencil squiggles across the tabletop before sanding.
When all the pencil marks disappear evenly, you know the surface is flat and sanded consistently.
Step 5: Assemble the Apron Frame
Build the rectangular frame that supports the tabletop. Lay out your apron boards and connect them at the corners using pocket-hole screws, dowels, or simple screw-and-glue joinery.
As you assemble, measure corner-to-corner in both directions.
When those diagonal measurements match, your frame is perfectly square.
👉👉 PRO TIP: If the diagonals are off, gently push or pull the frame into square before tightening the fasteners. Lock it in with clamps, then secure everything permanently.
Step 6: Attach the Legs to the Apron Frame
Position each leg inside a corner of the apron frame and clamp it in place.
Make sure the tops of the legs are perfectly flush with the top edge of the aprons.
Drill pilot holes, then secure the legs using screws and wood glue, or pocket holes from the aprons into the legs. Double-check for plumb and alignment before tightening everything down.
👉👉 PRO TIP: Setting the legs in about 1″ from each corner gives the table a more finished furniture look and helps prevent chipped corners—or stubbed toes.
Step 7: Add a Stretcher or Corner Braces
For extra stability—especially on longer tables—add a center stretcher between the long aprons or small corner braces inside each leg corner.
These pieces prevent the table from racking (twisting side-to-side) and make the whole base feel rock solid.
👉👉 PRO TIP: Even simple 2×2 corner blocks glued and screwed into each corner can dramatically increase the table’s strength without adding much work.
Step 8: Attach the Base to the Tabletop
Flip the tabletop upside down on a padded surface, then center your assembled base on it.
Use figure-8 fasteners, tabletop clips, or elongated screw holes in the aprons to secure the base.
These methods allow the tabletop to expand and contract with seasonal humidity changes —
without cracking.
👉👉 PRO TIP: Never screw a tabletop down through tight, fixed holes.
Wood movement is real, and locking it in place can split your top over time.
Elongated holes or clips are the safe, pro way to do it.
Step 9: Final Sanding and Ease the Edges
With the table fully assembled, give everything a final sanding.
Work your way through the grits—120, 180, then 220—to smooth out the aprons, legs, and tabletop. Lightly break the sharp edges with a sanding block or router so the table feels comfortable to the touch and won’t chip or catch sleeves later.
👉👉 PRO TIP: Run your hand along every edge and corner.
If anything snags your skin, it’ll snag clothing and cleaning rags too.
Soften those spots before you move on to finishing.
Step 10: Apply Stain and Finish
Choose your stain color (or skip stain if you prefer the natural look) and apply it evenly across the entire table.
Once it’s dry, start building your protective finish—polyurethane, polyacrylic, or an oil finish all work great. Apply thin coats, let them dry fully, and lightly sand between coats according to the product instructions. Two to three coats will give you a durable, long-lasting surface.
👉👉 PRO TIP: The first coat of finish will raise the grain and feel rough.
Don’t panic—that’s normal.
A quick scuff with 220-grit before the next coat will give you that buttery-smooth final surface.
🔥Final Thoughts…
Building your own wooden table is one of those projects that sticks with you.
Every screw, clamp, and sanding pass teaches you a little more about working with wood — and a little more about what you’re capable of. As the pieces start coming together, confidence builds right alongside the project itself, and when you finally set that finished table upright, it hits you:
You have just built a piece of real furniture that will last for generations to come!
That’s no small thing.
You took raw lumber and turned it into something functional, beautiful, and meaningful —
something your family will gather around, eat at, and make memories on.
Take what you learned here and keep that momentum rolling.
Your next great project is already waiting in the shop.
 More Woodworking Projects You’ll Enjoy
Here are a few other beginner-friendly project ideas you can try next:
-
How to Build a Wooden Mailbox – A sturdy outdoor project that teaches accurate layout and assembly.
-
Build a Simple Wooden Toolbox – A classic beginner project and a great way to organize your tools.
-
DIY Display Case – Learn clean joinery with a project that looks great in any room.
-
Craft a Kids’ Stool in 5 Steps – A quick build that teaches essential cutting and measuring skills.
These projects help you grow your skills while creating something you’ll enjoy for years to come.
You got this!
 Craft it. Shape it. Own it!
 Need More Plans?
 Click here to learn more about Ted’s Woodworking Plans.
If you want access to hundreds of additional woodworking projects and detailed tutorials, check out my full review of Ted’s Woodworking Plans.
It’s packed with step-by-step builds that are perfect for weekend projects.

 Turn Your Woodworking Passion Into Income
Click here to learn more about Wealthy Affiliate.
SawdustSmarty.com started as a small hobby —
and it only grew once I finally learned how to build a real website.
If you’ve ever thought about turning woodworking into a side income, the training at Wealthy Affiliate is what I personally recommend.
