

If you’ve been itching to dive into woodworking but don’t know where to start, you’re in the right place. In 10 Easy Woodworking Projects for Beginners, we’re taking the intimidation out of picking up your first tools and turning simple pieces of wood into something you can actually use.
These projects don’t require fancy equipment or expert skills—just a little time, a little patience, and the excitement of building something with your own two hands.
Whether you want to make practical items for your home, gifts for friends, or just learn the basics one step at a time, this guide walks you through projects that are fun, budget-friendly, and perfect for anyone new to the craft.
Let’s grab some wood, fire up the tools, and start building.

🧰 Handy Tools That Make These Projects Easier
You can complete most beginner projects with basic tools, but there are a few items that make every build smoother, cleaner, and way more enjoyable.
These are the tools I use constantly in my own shop — especially on small beginner-friendly builds.
🌟 Amazon Product Suggestion:
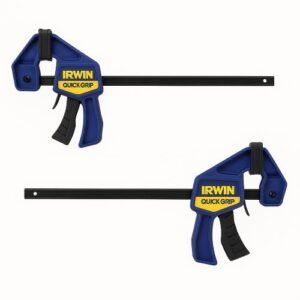
✔️ IRWIN QUICK-GRIP 6” One-Handed Mini Bar Clamp Set
(4-Pack)
These IRWIN Quick-Grip clamps are my go-to shop workhorses. Light, fast, and truly one-handed, they’re perfect for small builds like display cases, shelves, frames, and trim. Even with their compact size, they deliver solid pressure, lock cleanly, release smooth, and won’t dent your walnut thanks to the non-marring pads. If you want clamps you’ll actually enjoy using — these are the ones.
Why it’s great:
✔️One-handed operation makes positioning and clamping effortless
✔️Strong, consistent grip for small cabinet and display case builds
✔️Soft, non-marring pads protect delicate woods like walnut and cherry
✔️Lightweight design lets you run several clamps at once without fatigue
✔️Perfect for tight spots where full-size bar clamps won’t fit
✔️Extremely reliable — no slipping, no bending, no cheap-plastic flex
✔️Great for beginners and pros who want fast, frustration-free clamping
🌟 Amazon Product Suggestion:
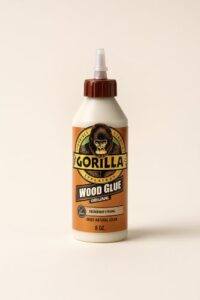
✔️ Gorilla Wood Glue – 8 oz Bottle
(Natural Wood Color)
When you’re building a walnut display case — or anything that needs to stay together longer than you will — Gorilla Wood Glue is the stuff you reach for without thinking twice.
It’s strong, it’s predictable, it dries the right color, and it just works. Perfect for joints, edge-gluing panels, shelves, frames, and any woodworking project where reliability isn’t optional.
Why it’s great:
✔️ Super strong bond — clamps up tight and holds like a tank
✔️ Dries natural wood color — blends beautifully with walnut, oak, cherry, and maple
✔️ Fast set time — ideal for small builds, cabinetry, trim, and furniture work
✔️ Water-resistant formula — great for long-lasting, indoor woodworking projects
✔️ Easy squeeze bottle — clean, controlled application with zero mess
🌟 Amazon Product Suggestion:
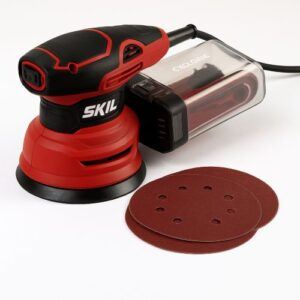
✔️ SKIL 5” Random Orbital Sander
(with Cyclonic Dust Box)
This SKIL 5” random-orbital sander is a killer little powerhouse — perfect for smoothing out your walnut display case, taking down glue squeeze-out, or prepping panels before finishing.
It’s compact, strong, and stupid-easy to control.
The built-in cyclonic dust box actually works (rare for budget sanders),
keeping the air cleaner while you work.
Why it’s great:
✔️ Random-orbit finish for smooth, swirl-free sanding
✔️ Cyclonic dust box that actually traps dust
✔️ Comfortable grip for long sanding sessions
✔️ Variable speed for precise control on any wood
✔️ Low vibration for accuracy and less fatigue
🌟 Amazon Product Suggestion:
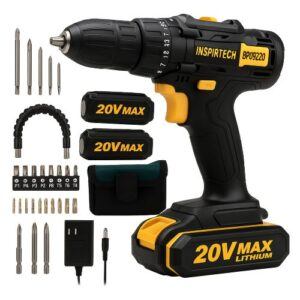
✔️ INSPIRITECH 20V Cordless Drill
(My Personal Choice!)
This is the cordless drill I use in my own shop, and it’s been rock-solid. The INSPIRITECH 20V kit includes two batteries, a charger, drill/driver bits, a flexible extension, and a handy tool bag. With 24 torque settings and a comfortable grip, it’s perfect for mailbox builds, repairs, and everyday woodworking.
Why it’s great:
✔️ Two 20V batteries — work nonstop
✔️ Includes bits, extension, and tool bag
✔️ Lightweight and easy to control
✔️ Strong enough for outdoor projects
✔️ Affordable, complete starter kit
1. Simple Wooden Tool Caddy (Beginner Project)
This classic tool caddy is one of the easiest and most satisfying starter projects you can build.
It uses just a few straight cuts, a couple of screws, and basic hand tools — perfect for beginners who want something useful they can finish in an afternoon.
Whether you use it to hold tools, craft supplies, garden gear, or even give it as a homemade gift, this project teaches measuring, cutting, drilling, and assembly without overwhelming new woodworkers.
What You’ll Need
-
1×6 boards
-
Wooden dowel (for the handle)
-
Wood screws
-
Sandpaper
-
Wood glue (optional)
Why It’s a Great Beginner Project
-
Straight cuts only — no complicated angles
-
Quick to assemble, even with basic tools
-
Teaches core fundamentals you’ll use in every future project
-
Super customizable with stain, paint, or decorative edges
👉👉 Pro Tip: If you’re new to drilling, use a piece of painter’s tape on your drill bit to mark the depth. It keeps your holes uniform and prevents accidental drill-through.
Quick Step-By-Step: How to Build a Simple Wooden Tool Caddy
Step 1 — Cut Your Boards to Size
Measure and cut the two end pieces, the bottom, and the side panels.
Keep all cuts square — this makes the whole project go together clean.
Step 2 — Drill the Handle Holes
Mark the center of each end piece and drill holes for the wooden dowel handle.
Make sure both holes are aligned so the dowel sits level.
Step 3 — Assemble the Caddy
Attach the sides to the bottom using screws or glue-and-screws for extra strength.
Slide the dowel through the handle holes, then secure the end panels to the sides.
2. Easy Scrap-Wood Birdhouse (Beginner Project)
A scrap-wood birdhouse is one of the simplest and most rewarding beginner builds you can tackle.
It teaches the basics—measuring, drilling, fastening, and simple roof assembly—without overwhelming you.
Best of all, you can build it using leftover offcuts from other projects, making it practically free.
Whether you keep it rustic, paint it bright, or add fun little details, it’s a perfect weekend warm-up for anyone new to woodworking.
What You’ll Need
-
Small scrap pieces of 1×4 or 1×6 boards
-
1¼” wood screws or nails
-
Drill + hole saw (for entrance hole)
-
Sandpaper
-
Outdoor paint or clear sealer (optional)
Why It’s a Great Beginner Project
-
Uses scrap wood you probably already have
-
Only straight cuts — no wonky angles or fancy joints
-
Teaches measuring, drilling, and simple roof assembly
-
Totally customizable with paint, colors, or little perch designs
👉👉 Pro Tip: Use a 1¼” entrance hole if you want to attract wrens and chickadees — they prefer small, cozy houses and it keeps larger birds out.
Quick Step-By-Step: How to Build a Scrap-Wood Birdhouse
Step 1 — Cut Your Boards
Cut the front, back, sides, and roof pieces from your scrap wood.
Keep the roof pieces slightly longer so they overhang.
Step 2 — Drill the Entrance Hole
Mark the center of the front board and drill the entrance hole before assembly.
This prevents tear-out and gives you cleaner edges.
Step 3 — Assemble the Body
Join the sides to the front and back using screws or nails.
Attach the roof pieces last, leaving a small gap for ventilation.

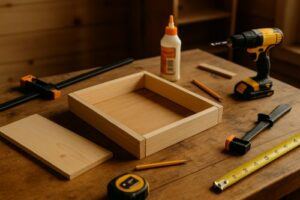
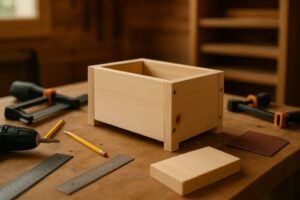
3. DIY Wooden Shelving Crate (Beginner Project)
A wooden crate is one of the most versatile beginner builds you can make.
It works as storage, décor, shelving, or even a rustic display box —
and the whole thing can be built with simple straight cuts.
It’s a great confidence booster for beginners because it looks impressive but takes minimal time, tools, and skill to pull off.
You can stain it, paint it, distress it, or leave it natural.
No matter what, you’ll end up with something useful you’ll actually want to keep around the house.
What You’ll Need
-
1×4 or 1×6 boards
-
Wood screws or brad nails
-
Wood glue
-
Sandpaper
-
Finish (paint, stain, or clear coat)
Why It’s a Great Beginner Project
-
Only straight cuts — no tricky joinery
-
Great for practicing square assembly
-
Cheap to build using basic boards
-
Looks good in any shop, garage, or home setting
-
Can double as storage, décor, or shelving
👉👉 Pro Tip: Use a small spacer block between slats when assembling the sides — it keeps all the gaps perfectly even and gives the crate a clean, professional look.
Quick Step-By-Step: How to Build a Wooden Shelving Crate
Step 1 — Cut Your Boards
Cut two end pieces, a bottom panel, and your side slats.
Keep your cuts consistent so the crate sits flat and square.
Step 2 — Build the Ends
Attach the slats to the end pieces first, evenly spaced.
This gives you two identical end panels to work from.
Step 3 — Assemble the Crate
Attach the bottom board between the two ends, then fasten the side slats.
Finish with a light sanding and the stain or paint of your choice.

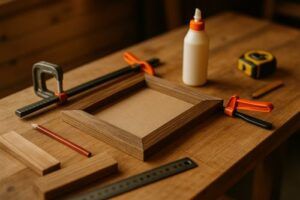
4. Rustic Scrap-Wood Picture Frame (Beginner Project)
A picture frame is one of those projects that feels “crafty” but still teaches real woodworking skills.
Using just a few scrap pieces of wood, you can build a rustic frame that works for photos, art prints, signs, or shop décor.
It’s fast, inexpensive, and incredibly satisfying to make — plus it’s one of the best beginner projects for learning accurate measuring and clean miter cuts.
You can keep it rough and rustic, sand it silky smooth, distress it with paint, or stain it deep and rich.
No matter your style, it’s an easy upgrade for any room or workshop wall.
What You’ll Need
-
Scrap 1×2 or 1×3 boards
-
Picture frame backing (cardboard or thin plywood)
-
Wood glue
-
Small nails or brad nails
-
Sandpaper
-
Finish (paint, stain, or clear coat)
Why It’s a Great Beginner Project
-
Uses very little wood — perfect for scraps
-
Can be built with simple straight cuts or 45° miters
-
Teaches accuracy in layout and measuring
-
Quick build — often under 30 minutes
-
Easy to customize with finishes or distressing techniques
👉👉 Pro Tip When cutting miters, mark each board individually rather than cutting them all to the same length. This keeps your corners tight and prevents gaps.
Quick Step-By-Step: How to Build a Rustic Picture Frame
Step 1 — Cut Your Frame Pieces
Cut four pieces of scrap wood to length, either with straight ends or 45° miters for classic corners.
Step 2 — Assemble the Frame
Arrange the pieces, apply glue, and fasten with small nails or brad nails.
A square or corner clamp helps keep everything aligned.
Step 3 — Add the Backing
Attach a thin plywood or cardboard backing to hold your photo or print in place.
Sand, paint, or stain the frame however you like.
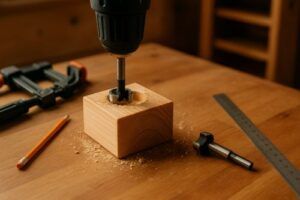
5. Simple Wooden Candle Holder (Beginner Project)
A wooden candle holder is one of the easiest projects for beginners and a great way to practice drilling clean holes while making something decorative.
Using a small block of wood and a few basic tools, you can create a classy, rustic candle holder that works for tealights, votives, or LED candles.
It’s quick, stylish, and perfect for learning precision drilling without needing a full workshop setup.
What You’ll Need
-
A scrap block of 2×4 or 4×4
-
Forstner bit or spade bit
-
Sandpaper
-
Wood finish (oil, stain, or clear coat)
Why It’s a Great Beginner Project
-
Very few cuts — often none at all
-
Teaches controlled drilling with larger bits
-
Looks great on desks, mantels, or shelves
-
Fast project — often under 15 minutes
-
Great use for scrap blocks
👉👉 Pro Tip: Use a Forstner bit for the cleanest hole edges — it leaves a crisp, flat-bottomed circle that looks much more professional than a standard spade bit.
Quick Step-By-Step: How to Make a Wooden Candle Holder
Step 1 — Cut or Select Your Block
Choose a scrap block of 2×4 or 4×4.
Square the edges if needed for a smooth, even look.
Step 2 — Drill the Candle Pocket
Mark the center and drill slowly with a Forstner bit.
Stop frequently to clear debris and prevent burning.
Step 3 — Sand and Finish
Smooth the block with sandpaper and apply stain, oil, or clear finish.
Drop in a tealight or LED candle and enjoy.
6. Basic Wall-Mounted Coat Rack (Beginner Project)
A wall-mounted coat rack is an easy, practical build that teaches beginners how to shape a board, drill pilot holes, and mount hardware.
It’s one of those projects that instantly upgrades an entryway, mudroom, or shop wall — and it only takes a few minutes to put together.
You can keep it rustic, stain it dark, paint it bright, or even add carved details if you want.
No matter the style, this project is great for learning clean layout and consistent spacing.
What You’ll Need
-
1×4 or 1×6 board
-
Coat hooks (2–5 depending on length)
-
Wood screws
-
Sandpaper
-
Finish (paint, stain, or clear coat)
Why It’s a Great Beginner Project
-
Straightforward design — just a single board and hooks
-
Teaches evenly spaced layout and mounting
-
Very low material cost
-
Quick build — often under 20 minutes
-
Practical and gift-worthy
👉👉 Pro Tip: Use painter’s tape along the face of the board when marking hook locations — it lets you draw clean layout lines without marking up the wood.
Quick Step-By-Step: How to Build a Simple Coat Rack
Step 1 — Cut and Prep Your Board
Cut your board to length (18″–30″ works great).
Sand the edges smooth and prep for finish.
Step 2 — Lay Out the Hook Positions
Use a tape measure and mark evenly spaced spots for each hook.
Drill small pilot holes to prevent splitting.
Step 3 — Install the Hooks and Hang It Up
Attach your hooks with wood screws, then mount the rack to the wall using keyhole brackets or simple screws.
Finish with stain or paint if desired.

7. Wooden Serving Tray (Beginner Project)
A simple serving tray is an awesome beginner project because it teaches clean assembly, edge shaping, and optional handle installation — all while giving you something classy to use in the kitchen, shop, or even as décor.
With just a few boards and screws, you can build a sturdy, good-looking tray that feels “advanced” but is totally beginner-friendly.
This project also gives beginners their first taste of sanding for a smooth finish, which is a HUGE confidence booster.
What You’ll Need
-
1×4 or 1×6 boards (for sides)
-
Thin plywood or 1× boards (for bottom)
-
Wood glue
-
Brad nails or screws
-
Handles (optional)
-
Sandpaper
-
Finish of your choice
Why It’s a Great Beginner Project
-
Straight cuts only
-
Teaches flush assembly and surface smoothing
-
Easily customizable with stain, paint, or handles
-
Looks more “advanced” than it really is
-
Makes a great gift or home décor piece
👉👉 Pro Tip: Sand the bottom panel before attaching it — it’s much easier to smooth the inside of the tray before the sides are assembled around it.
Quick Step-By-Step: How to Make a Simple Serving Tray
Step 1 — Cut Your Boards
Cut four side boards and one bottom panel.
Make sure all edges are smooth and square.
Step 2 — Assemble the Tray
Glue and nail the sides together around the bottom panel.
Make sure the bottom sits flush and the tray is square.
Step 3 — Sand and Add Handles
Sand all surfaces smooth, especially the inside corners.
Add handles if desired, then finish with stain, oil, or paint.
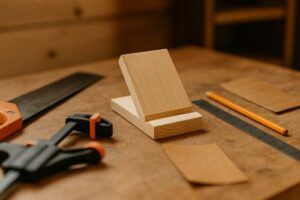
8. DIY Wooden Tablet or Phone Stand (Beginner Project)
A wooden phone or tablet stand is a fast, functional project that teaches beginners how to make clean angled cuts (optional), smooth surfaces, and assemble a simple support slot.
It’s one of the easiest “practical gifts” you can make, and it works great on a desk, nightstand, or kitchen counter.
You can build it from a single small board, customize the angle, or even add a cable notch for charging.
What You’ll Need
-
Small scrap piece of 1×4 or 1×6
-
Short dowel (optional for support peg)
-
Sandpaper
-
Wood glue (optional)
-
Finish (oil, stain, or clear coat)
Why It’s a Great Beginner Project
-
Uses very little material
-
Only a couple of cuts needed
-
Teaches clean slot or groove making
-
Fast project — often 10 minutes
-
Great practical item everyone can use
👉👉 Pro Tip: Cut your device slot at a slight backward angle (10–15°) —
it holds your phone or tablet much more securely and looks more professional.
Quick Step-By-Step: How to Make a Wooden Device Stand
Step 1 — Cut the Board
Cut a small piece of 1×4 or 1×6 to your desired size (typically 6–8″ long).
Step 2 — Make the Support Slot
Cut a shallow groove across the top edge using a handsaw or table saw.
Angle it slightly backward for better device support.
Step 3 — Smooth and Finish
Sand all edges smooth and apply your favorite finish.
Add an optional wooden dowel behind the slot for extra support.
9. Simple Wooden Garden Planter Box (Beginner Project)
A small planter box is an excellent beginner build because it requires only straight cuts, basic fastening, and simple assembly. You can make one for herbs, flowers, or even a small indoor plant —
and it looks great on porches, patios, and windowsills.
This project teaches beginners how to build a basic box structure, which is a core woodworking skill that carries over into dozens of future projects.
What You’ll Need
-
1×6 or 1×8 boards
-
Wood screws or brad nails
-
Drill or hammer
-
Sandpaper
-
Exterior paint or outdoor sealer
Why It’s a Great Beginner Project
-
Straightforward box design
-
Teaches accurate measuring and square assembly
-
Great practice for drilling or nailing
-
Works indoors or outdoors
-
Customizable with stain, paint, or drainage holes
👉👉 Pro Tip: Drill a few small drainage holes in the bottom panel before assembly —
it keeps your plants healthy and prevents water buildup.
Quick Step-By-Step: How to Make a Simple Planter Box
Step 1 — Cut All Your Panels
Cut the front, back, ends, and bottom panel from your boards.
Stick to straight cuts for the easiest assembly.
Step 2 — Assemble the Box
Attach the sides to the end panels, then secure the bottom.
Check for square as you go — it helps keep everything tight.
Step 3 — Sand and Seal
Lightly sand all edges smooth.
Finish with exterior paint, stain, or a weather-resistant sealer.
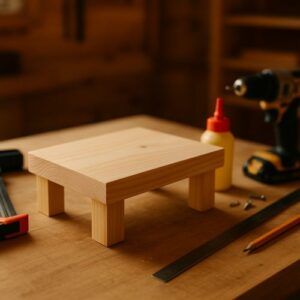
10. Wooden Shop Riser / Display Stand (Beginner Project)
A small wooden riser is an incredibly simple and useful project for beginners.
It’s basically a sturdy mini platform made from scrap wood, perfect for holding plants, speakers, candles, small tools, or for adding height to displays.
Despite its simplicity, it teaches rock-solid fundamentals: cutting legs to equal length, assembling clean joints, and making a stable, wobble-free surface.
Plus, it looks great in any workshop, home, or office — rustic or modern depending on the finish you choose.
What You’ll Need
-
Scrap pieces of 1×4 or 1×3 (for legs)
-
Scrap board for the top (1×6 or similar)
-
Wood glue
-
Brad nails or screws
-
Sandpaper
-
Stain, paint, or clear finish
Why It’s a Great Beginner Project
-
Uses very small amounts of wood
-
Teaches leveling and stability
-
Involves only straight, easy cuts
-
Incredibly versatile for home or shop use
-
Quick build — usually 15 minutes
👉👉 Pro Tip: Cut all four legs at the same time by stacking the boards —
this guarantees they’re exactly the same length, which keeps your riser rock-solid and wobble-free.
Quick Step-By-Step: How to Make a Wooden Riser
Step 1 — Cut the Legs and Top
Cut four identical legs and one top board.
The legs are usually 2–4″ tall.
Step 2 — Attach the Legs
Glue and nail or screw the legs to each corner of the underside of the top board.
Check for flush edges and straight alignment.
Step 3 — Sand and Finish
Smooth all edges, then stain, paint, or clear coat the riser.
Optional: add felt pads if it’ll sit on furniture.
Final Thoughts…
Woodworking doesn’t have to start with complicated furniture or fancy joinery.
These 10 easy woodworking projects for beginners are designed to help you build confidence while getting familiar with the basics — simple cuts, clean glue-ups, and that addicting feeling of making something real with your own two hands.
Each project is quick, approachable, and gives you a solid win to build on.
Once you’ve knocked out a couple of these, you’ll be surprised at how naturally your skills start to grow. From there, you’ll be more than ready to take on bigger builds, experiment with new techniques, and dive into the more detailed step-by-step guides waiting for you here on the site.
Keep going — you’re laying the foundation for everything you’ll build next.
 Craft it. Shape it. Own it!
🔧 Need More Plans Or Ideas?
👉👉 Click here to learn more about Ted’s Woodworking Plans:
If you want access to hundreds of additional woodworking projects and detailed tutorials, check out my full review of Ted’s Woodworking Plans.
It’s packed with step-by-step builds that are perfect for weekend projects.

💡 Turn Your Woodworking Passion Into Income
👉👉 Click here to learn more about Wealthy Affiliate
SawdustSmarty.com started as a small hobby — and grew because I finally learned how to build a real website.
If you’ve ever thought about turning woodworking into a side business or income stream, the training at Wealthy Affiliate is hands-down what I recommend.
