

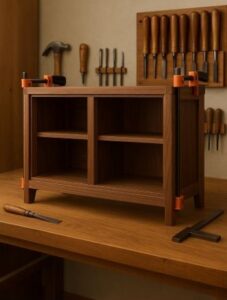
Building your own walnut display case is one of those woodworking projects that hits the perfect balance between skill, style, and satisfaction. Whether you want to showcase collectibles, handmade items, or family keepsakes, this project gives you a beautiful, functional piece that looks like it rolled straight out of a fine-furniture showroom.
In this guide, we’ll walk through every step of the build — from choosing the right lumber and making clean joinery cuts, to assembling the frame, adding doors, and applying a finish that makes that walnut grain glow. If you’ve been wanting a small furniture project that looks professional without requiring a full shop’s worth of tools, this is the one.
Let’s fire up the shop and build a display case you’ll be proud to show off.

🧰 Must-Have Tools for Clean, Accurate Woodworking
Every great woodworking project goes a whole lot smoother when you’ve got the right tools by your side. Here are a few dependable favorites that make measuring, sanding, and gluing feel effortless.
IRWIN QUICK-GRIP 6” One-Handed Mini Bar Clamp Set
Clamping small parts doesn’t have to slow you down.
These mini bar clamps give you quick, one-handed control that keeps everything steady while you work.
🌟 Amazon Product Suggestion:

✔️ IRWIN QUICK-GRIP 6” One-Handed Mini Bar Clamp Set
(4-Pack)
These IRWIN Quick-Grip clamps are my go-to shop workhorses. Light, fast, and truly one-handed, they’re perfect for small builds like display cases, shelves, frames, and trim. Even with their compact size, they deliver solid pressure, lock cleanly, release smooth, and won’t dent your walnut thanks to the non-marring pads. If you want clamps you’ll actually enjoy using — these are the ones.
Why it’s great:
✔️ One-handed operation makes positioning and clamping effortless
✔️Strong, consistent grip for small cabinet and display case builds
✔️Soft, non-marring pads protect delicate woods like walnut and cherry
✔️Lightweight design lets you run several clamps at once without fatigue
✔️Perfect for tight spots where full-size bar clamps won’t fit
✔️Extremely reliable — no slipping, no bending, no cheap-plastic flex
✔️ Great for beginners and pros who want fast, frustration-free clamping
SKIL 5” Random Orbital Sander
A smooth finish starts with the right sanding tool.
This orbital sander delivers fast, even results while keeping dust under control.
🌟 Amazon Product Suggestion:

✔️ SKIL 5” Random Orbital Sander
(with Cyclonic Dust Box)
This SKIL 5” random-orbital sander is a killer little powerhouse — perfect for smoothing out your walnut
display case, taking down glue squeeze-out, or prepping panels before finishing.
It’s compact, strong, and stupid-easy to control.
The built-in cyclonic dust box actually works (rare for budget sanders),
keeping the air cleaner while you work.
Why it’s great:
✔️Random-orbit finish for smooth, swirl-free sanding
✔️Cyclonic dust box that actually traps dust
✔️Comfortable grip for long sanding sessions
✔️Variable speed for precise control on any wood
✔️ Low vibration for accuracy and less fatigue
Gorilla Wood Glue – 8 oz Bottle
Strong joinery begins long before the clamps go on.
This reliable wood glue creates tight, durable bonds that hold your projects together for years.
🌟 Amazon Product Suggestion:
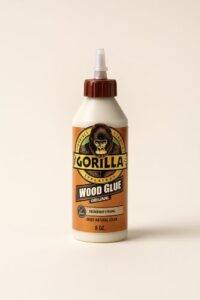
✔️ Gorilla Wood Glue – 8 oz Bottle
(Natural Wood Color)
When you’re building a walnut display case — or anything that needs to stay together longer than you will — Gorilla Wood Glue is the stuff you reach for without thinking twice.
It’s strong, it’s predictable, it dries the right color, and it just works. Perfect for joints, edge-gluing panels, shelves, frames, and any woodworking project where reliability isn’t optional.
Why it’s great:
✔️Super strong bond — clamps up tight and holds like a tank
✔️Dries natural wood color — blends beautifully with walnut, oak, cherry, and maple
✔️Fast set time — ideal for small builds, cabinetry, trim, and furniture work
✔️Water-resistant formula — great for long-lasting, indoor woodworking projects
✔️Easy squeeze bottle — clean, controlled application with zero mess
🔨 Step 1: Building the Base and Frame
Every great display case starts with a strong, square foundation. The base and frame determine how well everything fits later on — doors, shelves, and trim all depend on this early precision.
Here’s how to get it right.
1. Cut Your Walnut to Size
Start by breaking down your boards for the sides, top, bottom, and back supports.
A table saw or track saw works best here. Take your time —
clean, square cuts now mean a cleaner cabinet later.
2. Assemble the Outer Frame
Dry-fit your pieces first. Once everything lines up, add wood glue to the joints and clamp the frame together. Check for square using a speed square and/or by measuring corner-to-corner.
👉👉 Pro tip: If the diagonal measurements match, your frame is perfectly square.
3. Add the Interior Shelf Supports
Cut small support strips and attach them along the inside walls.
These will hold your shelves in place. Make sure they’re perfectly level —
nothing screams amateur like tilted shelves.
4. Sand the Frame Smooth
Before moving to the next stage, hit all surfaces with 120–150 grit.
Knock down sharp edges, glue squeeze-out, and any mill marks.
You want a clean foundation before adding shelves or doors.
🔨 Step 2: Install the Glass or Plexiglass Panels
Your display case isn’t complete until the door panels are installed.
Whether you choose real glass or plexiglass, the process is simple when you follow a few key steps.
1. Choose Your Panel Material
Glass gives you maximum clarity and a premium, furniture-grade look.
Plexiglass is lighter, shatter-resistant, and easier to cut at home.
Either works — choose based on the case’s size, how it’ll be handled, and your budget.
2. Measure Your Door Openings
Measure the inside opening of each door frame.
Subtract about ⅛-inch from both the height and width to ensure the panels fit without forcing them in.
👉👉 Pro tip: Hardware stores can cut panels to exact measurements for you.
3. Install the Panels
Place the panels inside the door frame recess, then secure them using:
-
Glass clips
-
Small trim strips
-
Clear silicone (for plexiglass only)
Avoid any adhesives directly on real glass — it can show through.
4. Smooth the Edges
If you’re installing real glass, lightly sand the sharp corners with fine-grit sandpaper.
For plexiglass, use a plastic-scoring knife or jigsaw with a fine blade and take your time. Quick cuts = cracks.
👉👉 Safety tip: Gloves + suction cups prevent a world of pain.
5. Test the Door Fit
Open and close each door to make sure the panels sit securely and don’t rattle.
This is where the project starts feeling like a real piece of furniture.
🪵 Woodworker’s Insight…
A tight clamp-up is the secret to a rock-solid display case that’ll last for decades.
🔨 Step 3: Customize Your Display Case (Optional Upgrades)
Once the frame and panels are complete, you can add a few personal touches to make your display case truly yours.
These upgrades aren’t required, but they can elevate the look and function of your finished piece.
1. Add Adjustable Shelves
Drill a row of evenly spaced shelf-pin holes inside the case.
This lets you change shelf height depending on what you plan to display —
taller collectibles, small items, or anything in between.
2. Install Simple LED Strip Lighting
Soft, warm LED strips mounted along the inside top can make your walnut grain pop and
highlight your items.
Just be sure to use low-heat LEDs to avoid drying out the wood over time.
3. Choose Your Hardware Style
Swap between modern black pulls, brushed nickel, or vintage brass to match the room
where your display case will live.
Hardware changes the whole vibe.
4. Add a Back Panel Upgrade
A walnut plywood back adds strength and gives the entire cabinet a solid, furniture-quality feel.
If you want more contrast, paint or stain the backer a different tone.
5. Finish With a Protective Topcoat
Walnut looks incredible under a satin polyurethane or an oil-based finish.
Apply several thin coats, sanding lightly between them for that silky, professional touch.
🔨 Step 4: Final Assembly & Finishing Touches
With the frame built and the panels installed,
it’s time to bring your display case together and make it shine.
1. Install the Doors
Attach your doors using quality hinges.
Soft-close hinges add a premium touch and prevent slamming.
Make sure the doors open smoothly and sit flush with the frame.
2. Add Your Shelves
Slide in your fixed or adjustable shelves.
If you added shelf pins, test each level to ensure everything sits level and secure.
3. Apply Your Finish
Walnut looks its best with a satin polyurethane or an oil-based finish.
Apply thin coats, sand lightly between each, and let the natural grain glow.
Waterproof finishes are great if the case will sit near windows or humid areas.
4. Protect the Bottom
Stick felt pads or rubber bumpers under the legs to prevent scratches on tables or floors —
especially if you’ll be moving the case around.
5. Clean & Polish
Once everything is dry, wipe the inside and outside with a clean microfiber cloth.
Remove any dust or fingerprints before loading in your collectibles.
⭐ Final Thoughts:
Building your own walnut display case is one of those woodworking projects that reminds you why you fell in love with the craft in the first place.
Clean joinery, beautiful grain, and a finished piece that actually means something.
Take your time, enjoy the process, and let the walnut do its magic —
The end result is a display you’ll be proud of for decades.
 More Woodworking Projects You’ll Enjoy
Here are a few other beginner-friendly project ideas you can try next:
-
How to Build a Wooden Mailbox – A sturdy outdoor project that teaches accurate layout and assembly.
-
Build a Simple Wooden Toolbox – A classic beginner project and a great way to organize your tools.
-
DIY Display Case – Learn clean joinery with a project that looks great in any room.
-
Craft a Kids’ Stool in 5 Steps – A quick build that teaches essential cutting and measuring skills.
These projects help you grow your skills while creating something you’ll enjoy for years to come.
You got this!
 Craft it. Shape it. Own it!
 Need More Plans?
 Click here to learn more about Ted’s Woodworking Plans.
If you want access to hundreds of additional woodworking projects and detailed tutorials, check out my full review of Ted’s Woodworking Plans.
It’s packed with step-by-step builds that are perfect for weekend projects.

 Turn Your Woodworking Passion Into Income
Click here to learn more about Wealthy Affiliate.
SawdustSmarty.com started as a small hobby —
and it only grew once I finally learned how to build a real website.
If you’ve ever thought about turning woodworking into a side income, the training at Wealthy Affiliate is what I personally recommend.

This is a fantastic walkthrough, and I love how clearly you’ve broken down each step of building a walnut display case. It’s the kind of project that looks intimidating at first, but the way you explain everything—from squaring the frame to installing glass panels—makes it feel totally achievable, even for intermediate woodworkers. What really stands out is your emphasis on precision early in the build. Little reminders like matching diagonal measurements or keeping shelf supports level are the kinds of details that separate clean, professional results from frustrating mistakes later on.
The tool recommendations are also spot-on. Good clamps, a reliable sander, and quality wood glue genuinely make a difference in projects like this, especially when working with hardwoods like walnut. Overall, this guide blends practical tips, pro insights, and clear explanations in a way that builds confidence. A great project for anyone wanting to level up their woodworking skills.
Andrejs, thank you so much for the thoughtful feedback! I really appreciate you taking the time to dig into the details.
This little walnut display case does look intimidating on the surface, but you nailed exactly why I wanted to write it—once you understand the order of operations and pay attention to those early precision steps, the whole project falls right into place.
Those diagonal checks, level shelf supports, and tight glue-ups are the kind of small things that make a big difference in the final look. And yep… good clamps, a solid sander, and reliable glue are absolutely the secret sauce with hardwood builds. They save a lot of headaches and keep everything crisp and clean.
I’m really glad the walkthrough hit that balance between “doable” and “professional.”
If you tackle this one, definitely come back and let me know how yours turns out — I’d love to see it!
Thanks again,
~Wayne
Building a walnut display case is a rewarding woodworking project that blends skill, precision, and aesthetics. This guide highlights the step-by-step process, from selecting and cutting walnut, assembling a square, sturdy frame, to installing glass or plexiglass panels, and finishing with a protective coat to enhance the grain. Optional upgrades like adjustable shelves, LED lighting, and personalised hardware allow customisation, while proper tools such as clamps, sanders, and wood glue ensure durability and a professional finish. Beyond functionality, creating a display case offers satisfaction in craftsmanship, giving woodworkers a long-lasting, elegant piece to showcase collectables or family keepsakes.
Keep up the good work!
Hi S.J.,
Thank you so much for the thoughtful comment!
You summed up the heart of this project perfectly — building a walnut display case really is the ideal mix of precision, creativity, and craftsmanship.
Once that frame is squared up and the panels go in, it all starts coming together in a really satisfying way.
I’m glad you mentioned the optional upgrades, too.
Little touches like adjustable shelves or LED lighting can take a simple case and turn it into a truly custom showpiece.
And you’re absolutely right about the tools — good clamps, a solid sander, and quality glue make all the difference when working with hardwoods like walnut.
Really appreciate you taking the time to share your thoughts.
Keep building, keep experimenting, and keep enjoying the craft!
Thanks again!
~Wayne