
When starting on how to craft a kid’s step stool in 5 steps, the first order of business is to round up all the necessary materials and get your hands on the right type of wood. This isn’t just about buying stuff at random. It’s about making choices that will keep the project smooth and safe. Let’s breakdown what’s needed and why the right wood matters.
You’ll need a saw, sandpaper, a drill with bits, screws or wood nails, wood glue for those solid bonds, and some good ol’ paint or finish. Don’t forget some protective eyewear and gloves! Safety first because you want to keep those hands and eyes intact while you work.
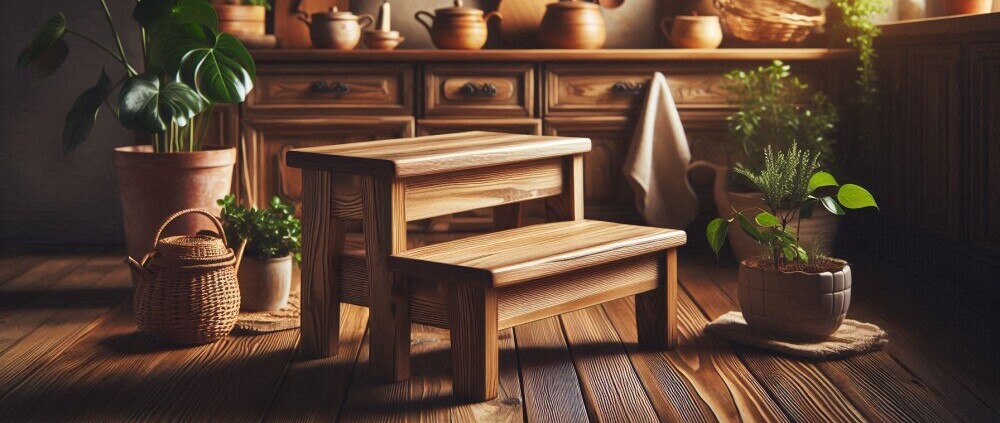
For a two-step stool perfect for a child, opting for strong, durable wood is critical. Pine is great for affordability and ease of handling for beginners. It’s light but sturdy enough. Oak or maple are fantastic if you don’t mind spending a little extra; they’re tougher and can handle more weight, meaning your stool will survive longer battles between siblings in the kitchen! Balancing strength and weight is key too. You need something solid, not absurdly heavy.
Choosing the right material is about foresight. Consider what the stool will be used for. Is it going in a tidy playroom or hopping around a chaotic kitchen? You want wood that matches the action it’ll see, and doesn’t turn into a family burden whenever it needs moving. Long story short: aim for robustness without sacrificing mobility. So, keep these factors in mind as you weigh up the options and prepare to embark on a project that’s as practical as it is fun.
** Here’s a little transparency: Our website contains affiliate links. This means if you click and make a purchase, we may receive a small commission. Don’t worry, there’s no extra cost to you. It’s a simple way you can support our mission to bring you quality content.**
As an Amazon Associate, I earn from qualifying purchases.
Designing and Cutting the Parts
Crafting a step stool involves more than just cutting wood into shapes. Designing the stool means thinking about stability, size, and shape, all while keeping in mind who’ll be using it. Kids are great, but they’re not known for their careful balance. So, you’ll need a design that’s more solid and steady than a mountain goat.
Having a simple, reliable template is a game-changer. Whether you draw it out yourself or download one online, ensuring your parts fit together like pieces of a puzzle is crucial. When you have a plan, getting the cuts right becomes way more manageable.
Using a circular saw or jigsaw, you can accurately cut out each piece. Follow the template, keep your fingers out of the danger zone, and always double-check your measurements. Be sure to measure twice and cut once or you will be measuring once cussing twice! Losing your religion right there in your woodworking shop.
Safety is the name of the game when you’re dealing with sharp tools. Keep the workspace clear, use clamps to hold pieces steady, and never get lax about wearing protection. A little patience here goes a long way towards keeping all your digits intact.
Design and precision might sound like an odd couple, but when they team up, you’ve got yourself one fantastic step stool. Plus, there’s a sweet satisfaction in seeing your design materialize piece by piece. It’s not just about making a stool; it’s about making something that welcomes a child to new heights — literally.
Assembling Step by Step
Once you’ve got all your wooden pieces cut out and ready to roll, it’s time to get them together and see your step stool come to life. This is where all the careful planning and cutting turns into something your kid can actually use.
Start by laying out your pieces on the ground or a large table to double-check that every part is there. Match it to your design plan, just like putting together a 3D puzzle. It’s okay if it looks a little off at first — part of DIY is fixing what doesn’t seem right.
When assembling, begin with the base. Join the sides to the steps using your trusty drill and screws, or nails if you prefer them for a sleeker look. Make sure everything’s aligned, and nothing’s wobbling. A steady hand helps, but a simple carpenter’s square or some measuring tape will ensure everything stays straight.
Those joints need to be secure, so don’t be stingy with the wood glue. Apply it to each connection before securing with screws. Wait a bit for the glue to set before proceeding to the next step. This ensures a firm bond and prevents future creaks and groans.
Balancing the stool so it doesn’t topple over is probably the most essential part. Make sure the footing is even and true, compensating for any uneven cuts or surfaces with a bit of sanding if needed. The goal is to prevent the stool from becoming an accidental surfboard!
Assembling a step stool from scratch transforms pieces of wood into a tool of independence for your child. It’s building confidence — for both of you — as the parts meld into a sturdy and safe creation.
Sanding, Finishing, and Painting
With the stool assembled and standing on its own, it’s time to refine that rustic look into something smooth and ready for little feet. This phase is about more than just aesthetics — it’s about ensuring safety and durability.
Start with a round of sanding. Grab some medium-grit sandpaper to knock down any rough edges or splinters. You might think it’s overkill, but you’d rather smooth it all out now than deal with tears when your kid snag their hands or toes.
Once you’ve taken off the rough bits, switch to a fine-grit sandpaper for a smooth, touchable finish. Kids like to explore everything, and you want every inch of this stool to be explorer-friendly. Sand until it feels as smooth as a polished stone.
After rounding off the sanding process, decide how you want to finish the stool. A coat of primer followed by child-safe paint can transform plain wood into a fantastic addition to any room. Go wild with colors — something bright and cheery might just inspire your kid to reach new heights.
Another great option is using a clear sealant or a wood stain that enhances the natural wood grain. Look for non-toxic finishes specifically designed for children’s furniture. The goal here is safety; you don’t want curious mouths tasting chemicals!
Finally, consider adding non-slip grips to the steps. Little feet can get excited, and traction on the steps helps prevent any slippery incidents. You can find non-slip paint add-ins or rubber tape that’ll do the trick just fine.
Taking the extra time to sand, finish, and paint ensures the stool is not only functional but an enticing piece of furniture your child will love. It’s about creating something that’s as appealing to look at as it is safe to use!
Final Touches and Tips for Longevity
With the stool painted or stained to look just how you imagined, you might think you’re done. But it’s these final touches that could make your step stool both a cherished keepsake and a practical tool for years.
Start by adding some personal flair. This could mean stenciling your kid’s name on it or painting their favorite characters. Get creative! This step is all about personalization and turning the stool into something that’s as unique as your little one.
Think about the little extras, too. Rounding off sharp corners if you haven’t already or double-checking to ensure all screws are tightly fastened — these details contribute to the overall safety and comfort. Your child’s misstep doesn’t have to turn into a parent’s nightmare.
As for keeping this stool in ship shape, a little TLC goes a long way. Regular checks for loose screws or nails over time, especially as the stool sees more use, can preempt any mid-climb mishaps. Consider refreshing the finish every year or so to keep it looking vibrant and to protect the wood.
If you did go with detachable parts or anything modular when designing it, show your kid how to adjust or fix it. Kids love playing handyman (or handywoman!), and this could be a great lesson in both responsibility and DIY basics.
Completing this project is like a rite of passage, taking you from novice to woodworking pro one step at a time. It’s proof that with the right materials, a touch of creativity, and dedication, you can create something that plays a small, yet significant role in your kid’s growth.
Happy building!
Here’s a great source for Woodworking Plans and Tutorials:

Interested in building a business in woodworking??

There are 100’s of ways you can build a business around your passion for the crafts.
Check it out…

I really enjoyed how detailed and beginner-friendly this guide was you made each step feel approachable while still emphasizing safety and durability. I like how you balanced practical tips with creative touches, especially the idea of personalizing the stool to make it special for the child. The non-slip grips suggestion is such a thoughtful addition for safety. Have you found that painted designs hold up well over time with heavy use, or is a stained finish generally more durable for kids’ furniture?
Thank you so much! I’m really glad the guide hit the right balance for you! Personalizing the stool is always one of my favorite parts, especially when it becomes something the child can feel proud of. Great question about the finish! In my experience, stained finishes tend to hold up better over time, especially with heavy, everyday use. Painted designs can still work well if sealed with a durable topcoat like polyurethane, but they might show chips or wear sooner… especially around the edges. If you’re aiming for longevity with a bit of flair, a stained base with painted accents sealed thoroughly can give you the best of both worlds!
Thanks again!
This post came at the perfect time!
I’ve been planning to order a 2-step stool for our 2-year-old, but my husband insists on building one himself since we already have tools like a jigsaw and a drill. After reading this, I’m starting to see his point—it actually looks doable and even fun! I love how you broke it down step by step without making it feel intimidating.
Do you think pine wood would hold up well for a toddler’s stool, or should we go for something sturdier like oak? Thanks again for this super helpful guide!
Thanks so much! I’m really glad the guide helped make the project feel approachable!!! Building something functional (and cute!) for your little one is such a rewarding project. Pine can definitely work for a toddler’s stool, especially if it’s thick enough and reinforced well, but if your kiddo is a climber or you want something super durable that’ll last for years, oak or maple would be great upgrades.
Either way, sounds like a fun weekend build with tools you already have — go team DIY’er!