
Scrap wood projects are a great way to turn leftover lumber into
something useful for your home or workshop.
Even small offcuts can be transformed into practical items
with just a few basic tools.
A scrap wood wall shelf is one of the easiest woodworking projects for beginners.
It helps you practice measuring, cutting, and assembling
while creating something functional.
Because the project uses small pieces of wood,
it can usually be completed in a single afternoon.
👉 Looking for more beginner builds?
Check out these scrap wood projects for beginners.
Quick Project Overview
| Project | Scrap Wood Wall Shelf |
|---|---|
| Skill Level | Beginner |
| Build Time | 1–2 hours |
| Tools Needed | Saw, drill, screwdriver |
| Materials | Scrap wood boards |
Materials Needed
This project can be built using just a few small pieces of scrap wood.
Materials:
-
scrap wood boards
-
wood screws
-
wall anchors or brackets
-
sandpaper
Tools:
-
saw
-
drill or screwdriver
-
measuring tape
-
level
Because the shelf uses leftover lumber,
it’s an inexpensive and beginner-friendly project.
Step 1: Cut The Shelf Pieces
Start by cutting the scrap wood pieces to the size you want for the shelf.
Most small wall shelves are about 12–18 inches wide,
but the size can be adjusted depending on your available scrap wood.
Make sure the edges are square so the shelf assembles cleanly.
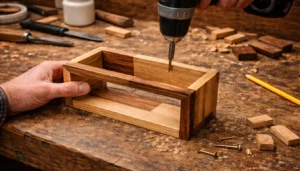
Step 2: Assemble The Shelf
Attach the shelf board to the support pieces using wood screws.
A simple design can include:
-
a flat shelf board
-
two small side supports
Pre-drilling the screw holes will help prevent the wood from splitting.
Step 3: Sand The Wood
After assembly, sand the shelf to remove rough edges and splinters.
Start with medium grit sandpaper and finish with fine grit to smooth the surface.
Sanding will also help prepare the wood for finishing.
Step 4: Mount The Shelf
Use screws or wall anchors to mount the shelf securely to the wall.
Make sure to:
-
check for level
-
secure into studs if possible
Once installed, the shelf can hold small items such as
plants, tools, or decorative objects.
Why Scrap Wood Shelves Are Great Beginner Projects
Projects like this help beginners practice important woodworking skills.
They allow you to practice:
-
accurate measuring
-
cutting straight lines
-
basic assembly
-
sanding and finishing
Even small scrap pieces can become useful additions to your home or workshop.
Final Thoughts…
A simple scrap wood wall shelf is an easy woodworking project that
turns leftover lumber into something practical.
It’s quick to build, beginner friendly, and useful in almost any room of your home or shop.
Small projects like this are one of the best ways to build woodworking skills
while creating something functional.
You got this!
 Craft it. Shape it. Own it!
 Need More Plans?
 Explore my full review of Ted’s Woodworking Plans to see what’s included.
If you’re looking for hundreds of additional woodworking projects and step-by-step tutorials,
take a look at my full review of Ted’s Woodworking Plans.
It’s packed with step-by-step builds that are perfect for weekend projects.
